As mentioned in the first part, node.js was initially developed for the cloud. While there are enough paid hosting providers available, much nicer is of course to get it running for free! :). We will try to get our node.js server of part 2 up and running in the cloud…
![]() One (or only?) free hosting is offered by https://www.heroku.com/. The free version is the starting (but full!) version of their full automatic horizontal scaling capabilities where you pay as you grow: actually you get a free single “dyno” per month which can also be used as a 2x dyno for half of a month.
One (or only?) free hosting is offered by https://www.heroku.com/. The free version is the starting (but full!) version of their full automatic horizontal scaling capabilities where you pay as you grow: actually you get a free single “dyno” per month which can also be used as a 2x dyno for half of a month.
Note: it will sleep when it gets idle after an hour or so, so for example the next day it will take a couple of seconds to get it started again.
To get started, you can read their quickstart guide in their good documentation, but I will show these steps myself too.
Step 1
Sign up. It’s free and no credit card has to be supplied!
Step 2
Install the Heroku Toolbelt (for example: for windows).
This toolbelt contains the “Heroku client” for creating and managing your apps, “Foreman” for local testing and debugging using the same environment as in the cloud, and a “git” client to commit and push your app to the remote git repository for automatic deployment.
Step 3
Login locally using the “heroku” client on the command line by typing:
heroku login
It will look like this:
(if you don’t have a heroku ssh key yet, it will ask you to create one)

After the first general steps, we need to do some special steps depending on our development language (because Heroku also supports java, ruby, etc). For node.js, you can read these steps in their “getting started with nodejs” guide. For this blog post, we will demonstrate these steps too.
Step 4
Before we can upload our node.js server of part 2, we need to create 2 files:
- package.json, a file for npm which describes our application and it’s dependencies, so it can be deployed easily on any other server (like heroku). This file is used to install or update all libraries on a (new) server.
- Procfile, a file for heroku, which describes the type and how to start our node.js server
package.json
We create this file with the following contents:
{
 "name": "smsnodejstest",
 "version": "0.0.1",
 "dependencies": {
    "socket.io": "0.9.6",
    "node-static": "0.5.9"
 },
 "engines": {
   "node": "0.10.x",
   "npm": "1.2.x"
 }
}
Note: the above dependencies are needed for part 4.
Procfile
We create a simple text file with the following contents (so it loads the JavaScript file generated by Smart Mobile Studio):
web: node www/output.js
We place these 2 files in the root folder of our project (like for example, in our demo)
Step 5
Next, we can test our server locally using foreman (part of the toolbelt). Start a new command prompt, go to the project root (where procfile and package.json are located) and type:
foreman start
(when it can’t find foreman you have to add the install path to the PATH environment variable of Windows, for example “c:\Program Files (x86)\Heroku\ruby-1.9.2\bin\”, and restart the console).
Somehow I got some errors but it seems to run fine:
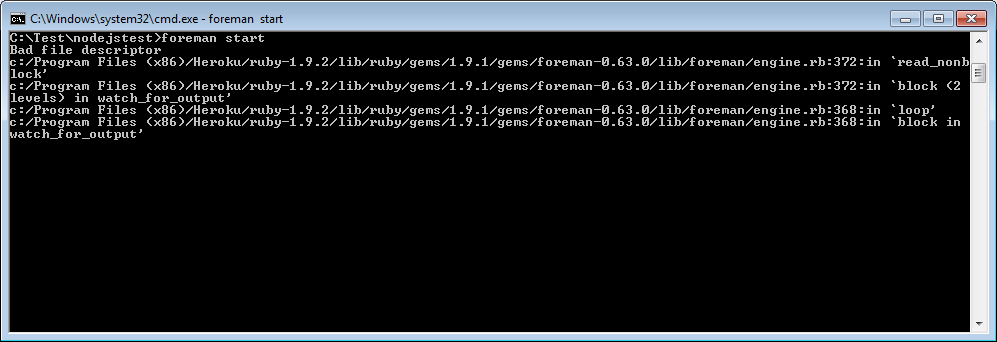
When we go to http://localhost we will see our hello world again 🙂
Step 6
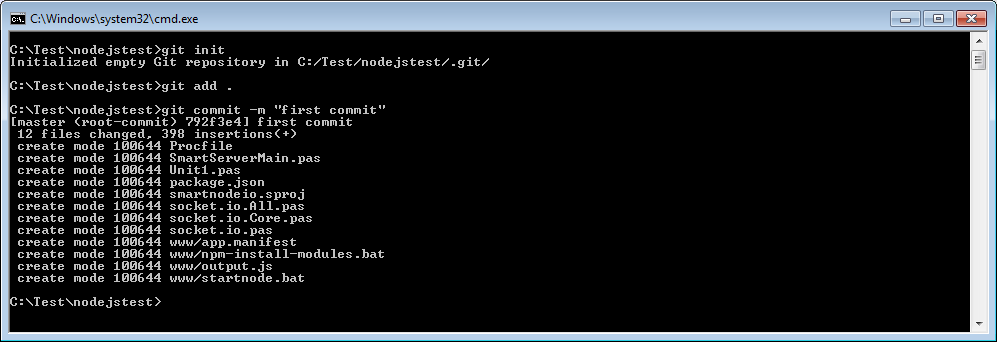
Next we need to store our application folder in git, by typing “git init” (initialize local git repo), “git add .” (add all files) and “git commit -m “first commit” “ (commit it locally). It will looks like this:
Note: because git is a decentralized version control system, we have committed our files only locally! Next we need to push it to a remote git server…
Step 7
To deploy our application in the heroku cloud, we need to create a remote heroku app. We do this using the heroku client on the command prompt again, by typing
heroku apps:create smsnodejstest –region eu

The last thing we need to do now is pushing our local git repo to the just created remote heroku repo by typing:
git push heroku master
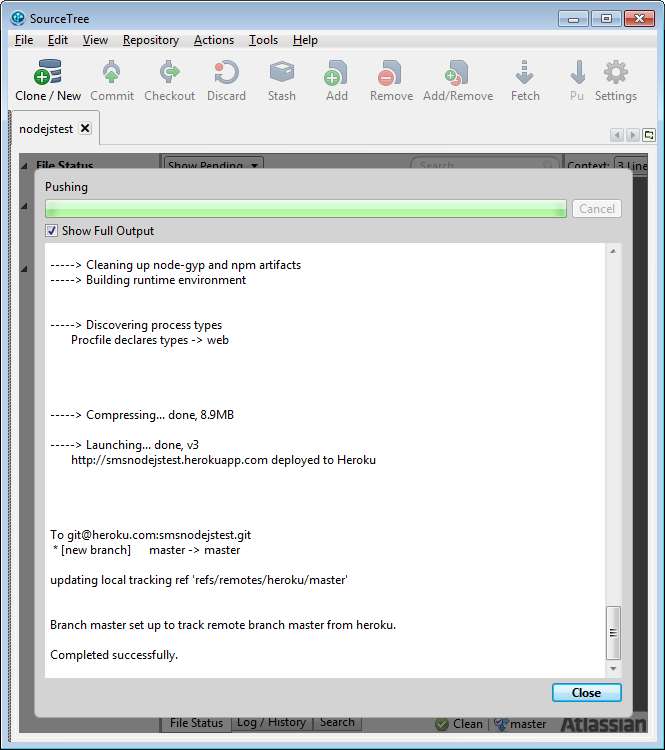
SourceTree
By the way, I had some troubles to get authenticated, it always complained about “Permission denied (publickey).” so I used the “SourceTree” GUI instead. To get it working with heroku I had to do (roughly) the following steps:
- loaded the created folder (recognized as a git repo) using “Clone/New-> Add working copy”
- converted my ssh keys to a putty key(?) using “Tools -> Create or import ssh keys”
- when pushing the commits, it will start “pageant” wherein I had to load my converted keys
And then all went fine… It will show some information about the deployment in the output window:
So, lets try our node.js demo in the cloud, using this url: http://smsnodejstest.herokuapp.com/
Hmmm, it fails with a “no such app” error. What happened?
Heroku logging
We can watch the debug logs of our remote app in the cloud using the command line (again), by typing:
heroku logs
There is too much (low level) information in it to show it here, but it seems it has something to do with our port: we use a fixed port 80, but this one is probably in use on the shared heroku server. So we have to use the following code:
 var port := 5000;  //default port of heroku?
 if Process.env.PORT > 0 then
   port := Process.env.PORT;
 server.listen(port, '');
The “PORT” environmental variable is set to a dynamic free port on the heroku server, but default it is 5000 (when testing locally).
After compiling, committing and pushing the changes, our remote app gets re-deployed and (finally) it works!
Final words
All right, the first time it needs some time to get it up and working, but after that, you only have to commit and push it (using git or a git gui like SourceTree) to re-deploy it (which works like a charm!).