Smart Mobile Studio 2.0 introduced an important visual component – a grid. As its use is not obvious, we have prepared a series of articles which will introduce the component and demonstrate the usage. Articles are written by the author of the grid component, Bojan Nikolic (Berg Soft).
In this article we’ll cover the most basic steps in grid usage.
- Placing W3Grid on a form
- Adding columns and setting column properties
- Adding rows and filling cells with data
1. Placing W3Grid on a form
1.1. Design-time
To create a TW3Grid component while designing a form, first click on the TW3Grid icon on the Data tab of the component palette:

Then, click on the design area. Now you may position and/or resize the grid as any other component.
1.2. Run-time
To create a W3Grid object in run-time, use the same approach as for creating any component in Smart Mobile Studio:
uses
  W3Grid;

type
  TForm1 = class(TW3form)
  private
    {$I 'Form1:intf'}
    MyGrid: TW3Grid;
  end;

implementation

{ TForm1}

// Create Grid object inside InitializeObject or inside some event
procedure TForm1.InitializeObject;
begin
  inherited;
  {$I 'Form1:impl'}
  MyGrid := TW3Grid.Create(Self);
  MyGrid.Visible := True;
It is important to remember to add the W3Grid unit to the uses section of your unit.
After the grid is created, you’ll most probably want to place it in a specific position. To do this, use the standard Top and Left properties. SetBounds method may also be used.
MyGrid.Top := 40;
MyGrid.Left := 8;
Beside the standard TW3Component properties and methods, TW3Grid includes specific properties and methods to control the look & feel of the control. Commonly you’ll want to set the HeaderHeigh and RowHeight. HeaderHeight specifies the vertical size (height) in logical pixels of the header area. RowHeight specifies the vertical size of every row added afterwards.
MyGrid.HeaderHeight := 26;
MyGrid.RowHeight := 24;
2. Adding columns and setting column properties
Before rows are added, columns must be added first. W3Grid is capable of showing and interacting with data in various ways. The type of a data in a cell is determined by the type of the column. For example, a cell may be displayed as a simple text, as a progress bar, toggle switch, an image ….
Smart Mobile Studio 2.0 supports following buit-in column types:
| Class | Accept as value |
|---|---|
| TW3TextColumn | any string |
| TW3NumberColumn | numbers (integer and float) |
| TW3ButtonColumn | any string |
| TW3ToggleSwitchColumn | boolean |
| TW3ProgressColumn | numbers (integer and float) |
| TW3SpriteColumn | bounds format |
To add a column, first create a TW3TextColumn object.
uses
  W3Columns;
…
var
  MyTextColumn: TW3TextColumn;
begin
  MyTextColumn := TW3TextColumn.Create(MyGrid as IW3ColumnsControl);
Then add the object to the Columns collection.
MyGrid.Columns.Add(MyTextColumn);
As every column descends from the TW3Column class, all column types share common properties and methods. Notable properties are Width and Header. To specify a width of cells within a column, simply set the Width property.
MyTextColumn.Width := 120;
After column is added, it may be accessed via the Columns property via its index (zero-based):
MyGrid.Columns[4].Width := 80;
As the grid includes the header area, every column may specify its own header title. This may be set via the Header property.
MyGrid.Columns[4].Header.Caption := 'First Name';
Every column type introduces specific properties and methods. For example TW3NumberColumn contains Precision property which only makes sense for this column type. Typecasting must be used to access type-specific properties or methods. For example:
TW3NumberColumn(MyGrid.Columns[2]).Precision := 2;
TW3TextColumn(MyGrid.Columns[2]).TextBefore := '$';
3. Adding rows and filling cells with data
3.1. Adding rows
After columns are added and configured, rows may be added. Most common way to add a row is by using the AddRow method.
MyGrid.AddRow;
The line above will add one new row at the end of the grid. To add multiple rows at a time, simply specify the optional Count parameter.
MyGrid.AddRow(20)
A handy TW3Grid.LastAddedRow property returns (zero-based) index of the last added row.
When a new row is added, each column creates its own type of cell inside the row. For example, a toggle switch column will create a cell with a toggle switch within, a progress column will create a progress bar inside a cell etc.
3.2. Filling cells with data
After cells are added, we may fill them with data. Every cell is an object and includes (Variant) Value property storing cell’s value. All we need is to access the Cell property.
W3Grid.Cell[ColumnIndex, RowIndex].Value := Value;
4. Example
Let’s conclude this article with a working example.
- Place a TW3Button component on a form.
- Double click the button to create an OnClick event.
- Edit code:
- Add the W3Grid units to uses list.
- Add the W3Grid components to the private section of the form class.
- Add the W3Button1Click code.
- Execute the project.
unit Form1;

interface

uses
  W3System, W3Graphics, W3Components, W3Forms, W3Fonts, W3Borders, W3Application, W3Button,

  { W3Grid }
  W3Grid, W3Columns;

type
  TForm1 = class(TW3form)
    procedure W3Button1Click(Sender: TObject);
  private
    {$I 'Form1:intf'}
    MyGrid: TW3Grid;
    MyTextColumn: TW3TextColumn;
    MyNumberColumn: TW3NumberColumn;
  protected
    procedure InitializeForm; override;
    procedure InitializeObject; override;
    procedure Resize; override;
  end;

implementation

{ TForm1}

procedure TForm1.W3Button1Click(Sender: TObject);
begin
  { Create and set Grid }
  MyGrid := TW3Grid.Create(Self);
  MyGrid.Visible := True;
  MyGrid.SetBounds(8, 40, 200, 100);
  MyGrid.HeaderHeight := 20;
  MyGrid.RowHeight := 18;

  { Create Text Column object
    & set Header's Caption}
  MyTextColumn := TW3TextColumn.Create(MyGrid as IW3ColumnsControl);
  MyTextColumn.Header.Caption := 'Text';

  { Create Number Column object
    & set Header's Caption }
  MyNumberColumn := TW3NumberColumn.Create(MyGrid as IW3ColumnsControl);
  MyNumberColumn.Header.Caption := 'Number';

  { Add both Columns into array }
  MyGrid.Columns.Add(MyTextColumn);
  MyGrid.Columns.Add(MyNumberColumn);

  { Add 1 new row & set 1st cell in newly added row }
  MyGrid.AddRow;
  MyGrid.Cell[0, MyGrid.LastAddedRow].Value := 'sample';
  MyGrid.Cell[1, MyGrid.LastAddedRow].Value := 240.5;

  { Set property specific for Number Column only }
  TW3NumberColumn(MyGrid.Columns[1]).Precision := 2;
end;

procedure TForm1.InitializeForm;
begin
  inherited;
  // this is a good place to initialize components
end;

procedure TForm1.InitializeObject;
begin
  inherited;
  {$I 'Form1:impl'}
end;

procedure TForm1.Resize;
begin
  inherited;
end;

end.
This simple demo will give you this 2×2 grid: 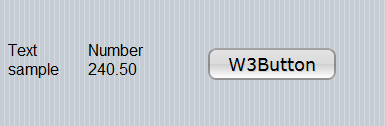
This post appears to be missing the WordPress MORE tag. 🙁
Sorry. Added now…