![]() About two years ago a detailed article about how to use Cordova has been published here. As times are changing quickly, an update for this becomes necessary. This article is about building hybrid web-apps with Cordova with Smart Mobile Studio.
About two years ago a detailed article about how to use Cordova has been published here. As times are changing quickly, an update for this becomes necessary. This article is about building hybrid web-apps with Cordova with Smart Mobile Studio.
At one point in the development of your mobile app, you might realize that it’s necessary to get closer to metal. Especially if you want to get direct and unrestricted access to sensors, hardware acceleration and other performance critical operations you might wish to have written the app natively. One option is to use the language benefit and port your app over to the Delphi with FireMonkey, but it might include rewriting a lot of stuff (maybe only except for the business logic itself).
A better way is to convert your web-app into a hybrid web-app. That is still a web-app, but it is embedded into a native webview. A native webview which you have full control of and which you can extend with everything that is natively possible. You could even write the required extensions for it in Delphi.
The webview itself is based on the native platforms webview, but can be configured towards your needs. On Android you can even switch the underlying engine (to use the latest Chromium build for example). This way you have better control over the compatibility of your app. And with that you can even target versions that do not support the latest W3C specifications itself.
But before we look at the twists, let’s start with the basics. As mentioned in the previous article Cordova can be installed via Node.js easily. Nowadays, it even give you detailed information during installation about how to set it up. You don’t necessarily need to follow the old instructions anymore. Often an
npm install -g cordova
is already enough. If you want the process to be even simpler, you could also pick to install phonegap or ionic (both cordova based and thus compatible).
Preparations for Cordova
Once Cordova is ready to run you can configure your Smart Mobile Studio project to support Cordova, supplying the information you might already have specified (like name, author and URL of the application). But let’s first activate the generation of a Cordova config file from the project options menu. You can find this setting in the ‘linker’ tab. (see screenshot)
![]()
With the activation the vendor specific settings for Cordova become relevant. You can see these in the screenshot below.
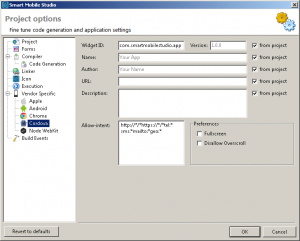
If the check box ‘from project’ is activated the information from the ‘project’ tab are used. This is useful so that you only need to specify the information at one place.
Currently the tab offers only two preferences for fullscreen and to disallow overscroll. While Cordova offers far more options, these are the ones that are available for all platforms supported by Cordova. The others are either platform dependent or specific to a few platforms only. In this case it is mandatory to configure these manually.
Icons
With the latest version of Smart Mobile Studio it’s also possible to generate all needed icons. Therefore, head over to the icons tab. Now you can either specify all icons you want to use by hand or choose the ‘default’ set (as can be seen below).![]()
By default, the Smart Mobile Studio icon is used, but you can easily pick any other icon.
To do so, just include any image file in your project (like you add any other resource to your project). Once this has been done, the icon can be chosen in the ‘Icon Source’ column, which can be edited with a doubleclick or by pressing F2. After you have changed the first icon, you can sync all other icons to the same icon source (right click -> ‘sync’).
If you now build your app, all the needed icons will be generated. At the same time all necessary information will be generated in the config.xml, so that the icons can be used in Cordova.
Adding Platforms
Once your application has been build in Smart Mobile Studio you can start adding platforms for Cordova to use. To do so, you have to go to the command line. Change the directory to the project’s root directory.
At this point you can add any platforms you like. For example to add the Android platform just type
cordova platforms add android
This will generate the required structure to build a hybrid web-app for the cordova platform.
Eventually you might want to add further plugins for this platform. Nowadays, this is not that much needed as HTML5 already contains nearly everything you need for a typical application. However, on Android you might want to install crosswalk, which – at its core – is a webview based on the latest Chromium code and thus actually has all the latest HTML5 specifications implemented.
It can be installed with:
cordova plugin add cordova-plugin-crosswalk-webview
With this command further assets will be downloaded from the internet.
Building the hybrid web-app
At this point it’s dead simple to actually build the hybrid web-app. Just type
cordova build
to actually build a native file for the selected platforms. In this case it will build a bunch of *.apk files. These files can be found under ./platforms/android/build/outputs/apk
Unfortunately, none of these .apk files are yet ready for publishing in the google play store. You have to sign these files first. As of version 5.0.0 of Cordova this process has been changed, but it’s still pretty simple and documented well.
Once you have provided your private keys (as described in the documentation) you can build a signed spk file with:
cordova build --release
This can now be distributed to any customer or uploaded to the google play store.
However, make sure you have tested the application with
cordova run --device
first. The supplied ‘–device’ argument ensures that it runs on a connected device as opposed to run in the emulator.
If you note a glitch you can easily inspect the device with the chrome browser with
That is at least if you have either installed the crosswalk webview or installed the cordova-plugin-console before. Also it’s typically disabled in the release build.