Smart Mobile Studio
  • News
  • Forums
  • Download
  • Store
  • Showcases
    • Featured demos
    • The Smart Contest 2013, Round 1 – Graphics
  • Documentation
    • Get the book
    • System requirements
    • Prerequisites
    • Getting started
      • Introduction
      • Application architecture
      • The application object
      • Forms and navigation
      • Message dialogs
      • Themes and styles
    • Project types
      • Visual project
      • Game project
      • Console project
    • Layout manager
    • Networking
      • TW3HttpRequest
      • TW3JSONP
      • Loading files
  • About

Monthly Archives: October 2011

Hardware accelerated webkit animations

Posted on 30.10.2011 by Jon Lennart Posted in Developers log

Working with hardware accelerated webkit animations under vanilla Javascript can be daunting. First of all it takes a while to understand the interrupt driven nature of the webkit engine (or “trigger” based is perhaps a more familiar word to us Delphians) and secondly because there are actually two types of animations (transitions), explicit and non-explicit (animations), which adds to the complexities.

Under OP4JS we have started out by supporting animations only, which basically means that you can trigger a pre-defined animation using either TNamedAnimation or any of our ready-made animation classes. If you wish you can trigger non-explicit animations (or transitions) as much as you like, but you will have to set the tag properties and css values yourself. The heart of our animation system resides in the W3Effects.pas file that is going to ship with the RTL – and you can expect it to grow once we start to issue updates and service packs.

Let me show you how easy it is to setup a hardware acellerated animation and play it:

[sourcecode language=”delphi”]
Procedure TForm1.HandleEffectDone(Sender:TObject);
Begin
TW3NamedAnimation(sender).free;
end;

Procedure TForm1.MoveHeader;
Begin
FEffect:=TW3NamedAnimation.Create;
FEffect.AnimationName:=’HEADER-MOVE’;
FEffect.Duration:=0.80;
FEffect.ExecuteEx(FHeader,NIL,HandleEffectDone);
end;
[/sourcecode]

And in our CSS file we define our animation (this will be automated in a future version of OP4JS):

[sourcecode language=”CSS”]
@-webkit-keyframes HEADER-MOVE {
from {
left: 100%;
top: 0px;
} to {
left: 0px;
top: 0px;
}
}
[/sourcecode]

Voila. That’s all it takes to make a control references by FHeader (or any control you want) to fly across the top of the screen using hardware acceleration (when available, not all platforms supports it directly and resort to software).

Keep it simple

It’s easy to go overboard with effects like this so try to keep in mind that every phone model is unique and have different performance levels. I am currently using 2 hardware accelerated “movers” to navigate between forms, and the difference between the iPhone 3GS and 4G is quite dramatic. It seems 3GS does not support hardware unless your control is placed directly on the document. So while it’s easy to spin things around – we must be prudent in when we use these things. Nothing is worse than an app where the effects get in the way of the actual substance.


Animations CSS3 hardware OP4JS webkit

TApplication coming to a close

Posted on 28.10.2011 by Jon Lennart Posted in Developers log
Always when you least need it

Always when you least need it

Yes, I know. This month was meant to be a very active time for OP4JS but sadly Norwegian weather brings with it complications like colds and the flu. So in short i have spent nearly 3 weeks off the grid with nothing but fevers, allergies and sneezing. So to those of you eagerly awaiting the Alpha release of OP4JS I am sad to inform you that we might have to push the date forward to make up for lost time.

Be that as it may my health is finally picking up after the onslaught of germs, viruses and weather up here – so for the past week I have been eagerly working on the object model, in this case: TApplication.

Much like under Objective C (which is the official language you use to create iOS applications, although you can now use alternatives) TApplication is the root controller object. It is in charge of creating a visible screen, kick-starting your application code, which in turn creates forms and register them, which is ultimately injected into the viewport. The viewport (or visible area) being a child object of TScreen – the place where forms do their thing.

Why go to so much trouble you ask? Well, it has to do with several aspects of HTML5 but first and foremost it deals with clipping and scrolling. You want your forms to slide in without problems under any webkit based browser (be it Safari Mobile or Chrome for Android). Secondly, we are trying to avoid having different TApplication models for each of our project types. We are currently aiming for 3 project types:

  • Graphical application (“form” based”)
  • Console application (for test purposes)
  • Game application
The nested layout made visible

The nested layout made visible

TApplication have to be dynamic enough to suit all 3 variations – and we also want to safeguard ourselves for the future where more project types come into play (libraries being on top of the list).

It also have to manage the forms you add to your application correctly, which means taking care of transitions, pre-positioning forms prior to movement and many more details. But thankfully we found a solution that is simple, elegant and robust. And no external dependency either. We might even drop jQuery soon because quite frankly: we dont need it.

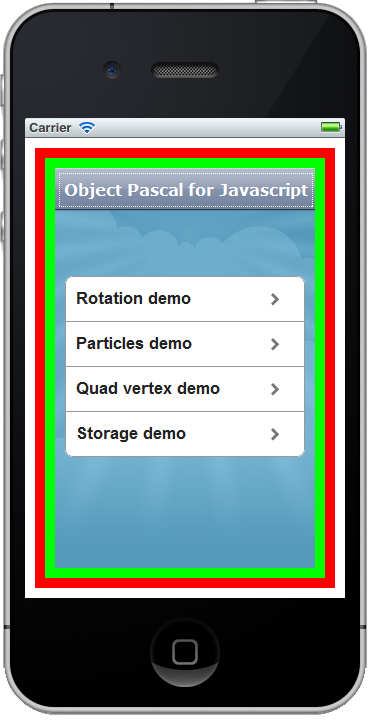
On your right is view of how we organize things. The white color is from the actual HTML5 document, the red color is TScreen – which in turn has a child TCustomControl called viewport (green).

The benefits of this layout is that you can (if you want to) add a global header directly to the TScreen object. So instead of each form descending from TW3HeaderForm (which as the TW3Header control built into it) you can just create one header for the whole app. Of-course this means that your forms have to change the title and deal with the back and next buttons directly – but that’s just as easy as it would be in ordinary Delphi.

The second benefit is more or less the same, except for the footer. Many native apps have main view controller that introduces a fixed header and footer, typically containing a tab-bar at the bottom and a toolbar on top. We want to support this because it solves a lot of problems (and also makes you apps faster. The less objects the faster it runs, that’s how it works in Delphi as well).

Well — I better get back to work!

Upcoming features

Your first OP4JS custom control

Posted on 05.10.2011 by Jon Lennart Posted in Documentation 1 Comment
There is a lot of work behind OP4JS

About 0.1% of the total OP4JS RTL system

Since the basic framework is nearing completion at high speed (although some modifications might appear) I thought it could be interesting to demonstrate how to create your very own custom control under OP4JS.

In the Delphi world there are two archetypal programmers: Those that stick to the high level interface of Delphi, meaning that they only use pre-made controls and rarely go beneath the bonnet so to speak – and the second group which create components, packages and love to fiddle around with low-level coding. This type of stereotyping is something more or less unique to RAD languages (which would include Delphi, Lazarus, Visual Basic, Real Basic and languages that are “design” based). In more mature languages like C++, Delphi (yes delphi is just as low level as the C++) or C# low-level work is almost unavoidable. But with Object Pascal you at least have a choice (!)

With OP4JS we have tried to retain much of the HLA (high level abstraction) of Delphi, but the system demands that if you want something unique – you have to create your own controls in order to stand out. If not, you might as well go with the many template-based “app machines” out there that produce programs that all look and feel the same.

The basics of a control

There are two types of controls you can create under OP4JS: Graphical controls and ordinary parent/child controls (like you are used to from Delphi). A graphical control is an object that contains a HTML5 graphics context and canvas, which means you have to draw it yourself. This is good for things like games, charts or anything that cant be represented using “normal” html.

The second type, which is the one 90% of all the standard controls that ship with OP4JS derive from, is TCustomControl. So let’s have a look at how setting up a fancy iPhone header looks like:


type

TW3HeaderControl = Class(TCustomControl)
private
  FLabel:     TLabel;
  FBackBtn:   TW3ToolButton;
  FNextBtn:   TW3ToolButton;
Protected
  Procedure   Resize;Override;
protected
  Procedure   InitializeObject;override;
  Procedure   FinalizeObject;override;
  Procedure   StyleTagObject;override;
End;

Under Delphi you would probably expect to see a constructor and destructor in the above code, but under OP4JS we try to synchronize the number of steps taken to establish a control (i.e number of resize and position operations). So to solve this we have introduced 3 new methods: InitializeObject, FinalizeObject and StyleTagObject. As the names imply you create any sub-controls and initialize your variables in InitializeObject (just think of it as your constructor), you destroy those instances in FinalizeObject, and you apply any extra styling or property alteration in the StyleTagObject method.

Clever styling

When a control is in the state of creation, it automatically set it’s own style class (think html here) to the name of it’s class. So in order to give our little control a nice look – we edit the default style sheet (this is automatically created when you create a new application) and make it look like a true iPhone header. The rule of thumb is: The name of the CSS class always matches the name of the OP4JS control:

.TW3HeaderControl
{
	background-image:-webkit-gradient(linear, left top, left bottom,
		from(#b2bbca),
		color-stop(0.25, #a7b0c3),
		color-stop(0.5, #909cb3),
		color-stop(0.5, #8593ac),
		color-stop(0.75, #7c8ba5),
		to(#73839f));
	border-top: 1px solid #cdd5df;
	border-bottom: 1px solid #2d3642;
	-webkit-box-shadow: rgba(33, 33, 33, 0.2) 0px 1px 1px;
}

Adding behavior

If you don’t know anything about CSS or HTML, don’t worry, you can always copy a style you like from the default skin, and there are plenty of examples around the Internet to learn from (or just get a good book, that would save you a lot of time). OK now we need to add some code to our unit to make it come alive:

Procedure TW3HeaderControl.InitializeObject;
Begin
  inherited;
  FLabel:=TLabel.Create(self);
  FLabel.BorderStyle:=bsDotted;
end;

Procedure TW3HeaderControl.FinalizeObject;
Begin
  FLabel.free;

  if assigned(FBackBtn) then
  FBackBtn.free;

  if assigned(FNextBtn) then
  FNextBtn.free;

  inherited;
end;

Procedure TW3HeaderControl.StyleTagObject;
Begin
  inherited StyleTagObject;
end;

Procedure TW3HeaderControl.Resize;
var
  wd,hd:  Integer;
  mTemp:  Integer;
  dx:     Integer;
Begin
  wd:=Width;
  hd:=Height;

  mTemp:=wd;
  dx:=4;
  dec(mTemp,4); //left margin
  dec(mTemp,4); //Right margin

  if  assigned(FBackBtn)
  and (FBackBtn.Visible) then
  Begin
    //space between "back" & label
    dec(mTemp,FBackBtn.width);
    dec(mTemp,2);

    //offset the left edge of the label
    inc(dx,FBackBtn.Width);
    inc(dx,2);

    // position the back-button
    FBackBtn.Left:=4;
    FBackBtn.Top:=4;
  end;

  if  assigned(FNextBtn)
  and (FNextBtn.Visible) then
  Begin
    //space between label & "next" button
    dec(mTemp,FNextBtn.width);
    dec(mTemp,2);
    FNextBtn.Left:=mTemp;
    FNextBtn.Top:=4;
  end;

  FLabel.left:=dx;
  FLabel.top:=4;
  FLabel.Width:=mTemp;
  FLabel.Height:=Height-8;
end;

Why all that code? First of all because it’s just a quick example and secondly, because a typical iPhone header have 3 parts: A back button, a next button and some text in the middle. The above code checks to see if you actually have created a back or next button and shrinks the text area accordingly. Let’s see how it looks so far:

That was easy enough

That was easy enough

I have set the label to have a dotted frame just to make it easier to work with, we will of-course remove the frame all together later. But now, let’s add some more methods to the class interface. We want to expose the label object to give the user access to it’s full capabilities (caption, font, background, orientation and all the rest), and we also want both back and next buttons.

But, we want to keep resources to a bare minimum, so we will use the old “need” trick and only create the buttons when asked for. So the buttons will only be created when you access them:

TW3HeaderControl = Class(TCustomControl)
private
  FLabel:     TLabel;
  FBackBtn:   TW3ToolButton;
  FNextBtn:   TW3ToolButton;
  procedure   ReleaseButtons;
  Procedure   NeedBackButton;
  Procedure   NeedNextButton;
  function    getBackButton:TW3ToolButton;
  function    getNextButton:TW3ToolButton;
protected
  Procedure   Resize;Override;
protected
  Procedure   InitializeObject;override;
  Procedure   FinalizeObject;override;
  Procedure   StyleTagObject;override;
public
  Property    BackButton:TW3ToolButton read getBackButton;
  Property    NextButton:TW3ToolButton read getNextButton;
  property    Title:TLabel read FLabel;
  Property    Options:TW3HeaderButtonOptions read FOptions write setOptions;
End;

And the implementation for our new methods are (this is just a quick example):

Procedure TW3HeaderControl.NeedBackButton;
Begin
  // Create object on the fly if required
  if not assigned(FBackBtn) then
  Begin
    BeginUpdate;
    FBackBtn:=TW3ToolButton.Create(Self);
    SetReSized;
    EndUpdate;
  end;
end;

Procedure TW3HeaderControl.NeedNextButton;
Begin
  // Create object on the fly if required
  if not assigned(FNextbtn) then
  Begin
    BeginUpdate;
    FNextbtn:=TW3ToolButton.Create(Self);
    SetReSized;
    EndUpdate;
  end;
end;

function TW3HeaderControl.getBackButton:TW3ToolButton;
Begin
  NeedBackButton;
  result:=FBackBtn;
end;

function TW3HeaderControl.getNextButton:TW3ToolButton;
Begin
  NeedNextButton;
  result:=FNextBtn;
end;

procedure TW3HeaderControl.ReleaseButtons;
Begin
  if assigned(FBackBtn) then
  Begin
    FBackBtn.free;
    FBackBtn:=NIL;
  end;

  if assigned(FBackBtn) then
  Begin
    FNextBtn.free;
    FNextBtn:=NIL;
  end;
end;

The final product

To use our new control, all we have to write (in our Form’s InitializeObject for instance) is something like:

FMyCoolHeader:=TW3HeaderControl.Create(self);
FMyCoolHeader.BackButton.Caption:='Back';
FMyCoolHeader.BackButton.onClick:=HandleBackButtonClicked;
FMyCoolHeader.Title.Caption:='My cool header!';

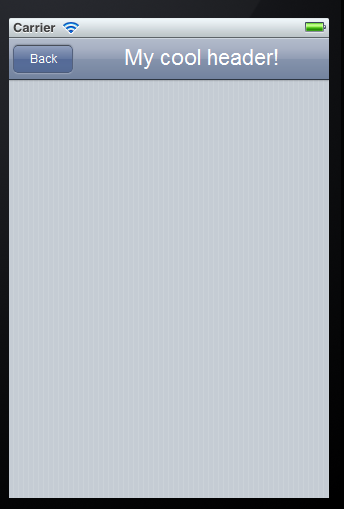
And voila – we have a nifty iPhone header that looks and feels like the real thing 🙂

Easy but effective

Easy but effective

Notes and addendum

This example is very, very simple. It was put together in 5 minutes just to demonstrate how easy it is to get going and is in no-way an example of code quality or approach. I can think of 1000 ways of making a better header control (the one that ships with OP4JS has a lot more code and does not create buttons this way, and yes — exceptions and error handling is a must).

CSS graphics iOS Smart Mobile Studio tutorial

Control complexity and mobile resource management

Posted on 04.10.2011 by Jon Lennart Posted in News and articles 2 Comments
This is not just a picture, but actually the background set for a picture

This is not just a picture, but actually a multi layered view. The buddha is a background for an image placeholder. Quite dynamic and neat

Products like Embarcadero Delphi comes with a rich set of controls ready for use in your applications. If we compare the resource demands of these controls today (Delphi XE or XE2) to those that once shipped with Delphi 1 – or Delphi 7 even, the amount of resources a well designed form consumes has grown exponentially over the years.

As the operative system was grown more complex both in terms for functionality, responsiveness, mobility and the developers need for modern features, the amount of methods and auxiliary classes connected to a single control has become very large. As a result, the amount of memory and CPU requirements have grown with it.

The mobile scene

One of my primary concerns when we sat down to talk about OP4JS control library was simply that it would be over-kill to even attempt to emulate the VCL under javascript. In my notes the primary points were:

  • The amount of JavaScript generated would exceed the restrictions of these devices
  • The HTML5 architecture is incompatible with classical VCL programming
  • The controls would be to slow for practical use

Thankfully my worries were unfounded on all accounts, because we have more or less built a VCL clone. It is and has been quite a challenge. As you may know HTML5 introduces a high-level interface onto ordinary html. It is different not so much in terms of syntax, but rather in philosophy, inspired no doubt by the MVC (model view controller) paradigm imposed on the world by Apple computers. In short, the CSS styling represents the “view” part, the actual html tags the “model” and Javascript the controlling factor. Javascript is what provides behavior to otherwise empty, stateless constructs.

Getting these things to even resemble the VCL has been, well, let’s just say I havent played with my kids in a few weeks.

Doing the math

CSS transitions and events

CSS transitions and events

Luckily, the complexity versus efficiency argument is turning in our favour. Delphi developers like myself have a tendency to over-think the actual needs of our customers, and inside our own heads we are always trying to outsmart other programmers that may – or in most cases – may not be going over our code with a fine tooth comb. This can either drive us to excel at what we do or into obsessive nerds that polishes a piece of code so long – that the platform is dead if he ever finishes.

So, once in a while it’s wise to do a sanity check on your code-base (and your own expectations). Fact is that mobile apps are for the most part quite lightweight. If we for sake of argument say that a mobile app has 10 forms (or views if you prefer) and each of these views is populated by 20 controls. Some controls are composite, meaning that they have child controls (like a toolbar which uses a buttons) while other are vanilla, run of the mill stuff like labels and lists. You may also have a database running under the hood as well.

Adaptable and suitable

So an app consisting of 200 javascript objects is really not that huge. It would result in quite a bit of generated code of-course, but the browser chews through this like it was nothing at all. And you wouldn’t even be close to the limitations set down by Apple or Google regarding size. Strange as it may seem – my test app written in Op4JS both loads and executes faster than it’s native counterpart written in C# (which compiles to a single binary on iOS). The only exception being complex graphics (which you would normally use a DIB library for) and heavy-duty number crunching. But those are things you don’t want to have on your phone anyways. It’s possible of-course, but not practical.

To me at least, mobile development is about information and communication and presentation. It’s about getting or storing data and presenting it on a portable device in a practical manner. It’s also about using the format in a way that makes sense to the consumer.

External resources

  • Model View Controller – Wikipedia article
  • C# Mono Touch – Xamarin website
  • HTML5, A vocabulary and associated APIs for HTML and XHTML, WC3 reference
  • Embarcadero Delphi website
HTML5 javascript Smart Mobile Studio

Pages

  • About
  • Feature Matrix
  • Forums
  • News
  • Release History
  • Download
  • Showcases
    • The Smart Contest 2013, Round 1 – Graphics
  • Store
  • Documentation
    • Creating your own controls
    • Debugging, exceptions and error handling
    • Differences between Delphi and Smart
    • Get the book
    • Getting started
      • Introduction
      • Local storage, session storage and global storage
      • Application architecture
      • The application object
      • Forms and navigation
      • Message dialogs
      • pmSmart Box Model
      • Themes and styles
    • Layout manager
    • Networking
      • Loading files
      • TW3HttpRequest
      • TW3JSONP
    • Prerequisites
    • Real data, talking to sqLite
    • System requirements
    • Project types
      • Visual project
      • Game project
      • Console project

Archives

  • December 2019
  • December 2018
  • November 2018
  • July 2018
  • June 2018
  • February 2018
  • September 2017
  • April 2017
  • November 2016
  • October 2016
  • September 2016
  • April 2016
  • March 2016
  • January 2016
  • October 2015
  • September 2015
  • July 2015
  • April 2015
  • January 2015
  • December 2014
  • October 2014
  • September 2014
  • August 2014
  • July 2014
  • June 2014
  • March 2014
  • February 2014
  • January 2014
  • December 2013
  • November 2013
  • October 2013
  • August 2013
  • July 2013
  • June 2013
  • May 2013
  • April 2013
  • March 2013
  • February 2013
  • January 2013
  • December 2012
  • November 2012
  • August 2012
  • July 2012
  • June 2012
  • May 2012
  • April 2012
  • March 2012
  • February 2012
  • January 2012
  • November 2011
  • October 2011
  • September 2011

Categories

  • Announcements (25)
  • Developers log (119)
  • Documentation (26)
  • News (104)
  • News and articles (16)

WordPress

  • Register
  • Log in
  • WordPress

Subscribe

  • Entries (RSS)
  • Comments (RSS)
© Optimale Systemer AS