There was a question about “adjusting the background color of a form” a while ago. There are actually several ways to adjust the background color of a form, and one should know how Smart works on this area to be able to give the app you’re working on a visual face lift.
Since the various methods might interfere with each-other, it’s important to know the dependencies between the various methods. For example, if you set color by code in the OnCreate method, this will ignore the color in the Object Inspector…
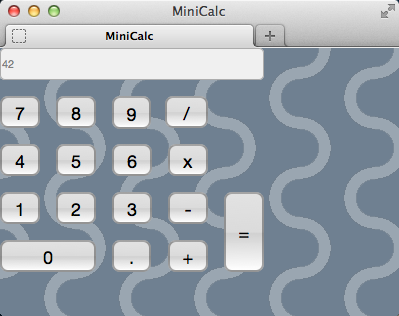
I’ll go trough the various methods by using the classical “Calc (by Eric Grange)” demo in the Demos folder.
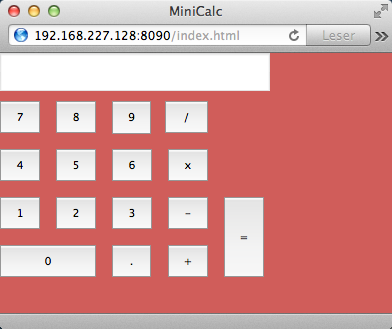
Original demo
Open this project one and follow these steps:
Change by code
As you can see, Eric already sets the color in InitializeObject. In Form1, line 45, you’ll find the code:
Color := clIndianRed;
Which is the same as:
Self.Color := clIndianRed;
If you change this color to eg.
clTeal
, you will see the immediate change when you hit F9.

This approach is just the same as setting the color in the Object Inspector.
Change by using the ObjectInspector

Comment out (or delete) line 45, and switch to the visual designer. Select the From and set Color to
clMaroon
. Hit F9, and you’ll see the change.
The settings in the ObjectInspector are applied in the
{$I 'Form1:impl'}-part of InitializeObject. Ie. if you try to set the color by code before this line, the setting from the ObjectInspector will override this by applying the ObjInsp-properties in the
{$I 'Form1:impl'}-line.

Maroon
Change by using the CSS
If you try these steps in a brand new project, you will not get the same result. You will notice some changes, but only as stripes across the background. Why’s that?

Well, I’ve already revealed the answer in the title 😉
It’s the stying in the CSS. If you compare the setting in the Calc-demo with a new project, you will notice that the
StyleClass
property is set to
TW3Form
in a brand new project, while it’s altered to
none
in Eric’s Calc demo. The Smart you’ll notice that the CSS class name is similar to the component class name. This makes it very easy to update the visual appearance of all components in your projects by simply modifying the CSS.
Now, if you set the
StyleClass
property to
none
in your brand new project, you will get the full effect from the changes you’ve made in the ObjectInspector or by code. 🙂
Change by really using the CSS
OK. The change above was really all about not using the CSS. 😛
Lets use the CSS to create some nice visual look…
Eric’s demo is quite old. It’s actually from the early alpha/beta development.
We have done some changes to the HTML and CSS after this demo was created, so when you’re going to adjust stuff here, you would want to update these two files first. Right-click each of them in the project inspector and select “Revert to default”.
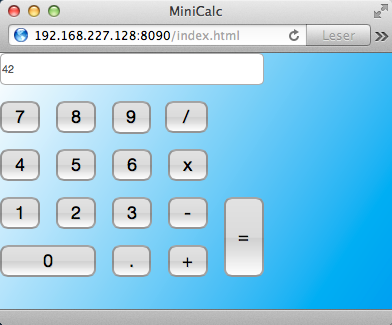
Set the form’s
StyleClass
property to
TW3Form
, and Execute.
You will now get the classic iOS stripes as background.
Classic iOS look
Open the CSS-file and navigate to the TW3Form definition (Use Alt+G and move to line 684).
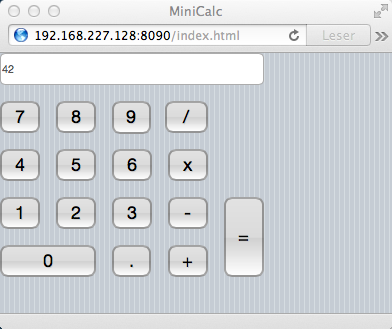
At http://ie.microsoft.com/testdrive/graphics/cssgradientbackgroundmaker/ and http://www.colorzilla.com/gradient-editor/ you can generate various gradient backgrounds. Try for instance the default one, and replace the whole CSS class with this code:
.TW3CustomForm, .TW3Form
{
  background-image: -ms-linear-gradient(top left, #FFFFFF 0%, #00A3EF 100%);
  background-image: -moz-linear-gradient(top left, #FFFFFF 0%, #00A3EF 100%);
  background-image: -o-linear-gradient(top left, #FFFFFF 0%, #00A3EF 100%);
  background-image: -webkit-gradient(linear, left top, right bottom, color-stop(0, #FFFFFF), color-stop(1, #00A3EF));
  background-image: -webkit-linear-gradient(top left, #FFFFFF 0%, #00A3EF 100%);
  background-image: linear-gradient(to bottom right, #FFFFFF 0%, #00A3EF 100%);
}
Gradient background
This looks nice, huh?
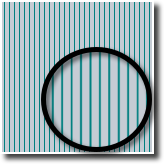
You can further experiment with some more fancy CSS background, like the ones on http://lea.verou.me/css3patterns/:
.TW3CustomForm, .TW3Form
{
  background:
  radial-gradient(circle at 100% 50%, transparent 20%, rgba(255,255,255,.3) 21%, rgba(255,255,255,.3) 34%, transparent 35%, transparent),
  radial-gradient(circle at 0% 50%, transparent 20%, rgba(255,255,255,.3) 21%, rgba(255,255,255,.3) 34%, transparent 35%, transparent) 0 -50px;

  background-color: slategray;
  background-size:75px 100px;
}
I’m not sure why, but this doesn’t show correctly in the internal browser or in Safari (even though the original site is OK in Safari). FF, IE and Chrome is OK.
Probably some vendor prefix issue…
CSS Pattern
Hey. Why not make it even cooler!
With images as background, you can create some really nice look.
Just do a Google-image search for “free nice backgrounds” and pick a background you like (but be aware of the license if you’re going to redistribute things you find on-line. There are plenty of cheap graphics you can buy out there!).
Add any of these backgrounds to your project (just drag it into the Project Manager in the Smart IDE, and it will be added to the project. At compile-time it’s extracted to the “res” folder).
And use this CSS:
.TW3CustomForm, .TW3Form
{
  background-image:url('res/bg.jpg');
}
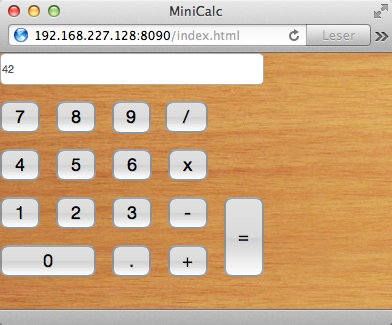
Image as background
While we’re at it – why not combine a few images and create a nice calc for kids…
(Graphics and code from http://learn.shayhowe.com/html-css/backgrounds-gradients)
Add the three images to you project, and use this code:
.TW3CustomForm, .TW3Form
{
 background:
  url('res/dyno.png') no-repeat 280px 18px,
  url('res/grass.png') no-repeat 0 100%,
  url('res/sky.jpg') repeat 0 0;
}
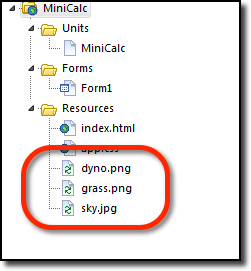
Add three images as resources to the project.
Why stop there?
Let’s brush up the buttons and labels as well…
Replace the TW3Edit-look at line 347 with this code
.TW3Memo, .TW3EditBox, .TW3ComboBox {
  border: 2px solid #333333;
  resize: none;
  -webkit-border-radius: 5px;
     -moz-border-radius: 5px;
      -ie-border-radius: 5px;
    font-family: "Helvetica Neue", Verdana, sans-serif;
    font-size: 18px;
    font-weight: bold;
    text-shadow: 1px 1px -1px #cecece;
}
And insert this code at line 715 (right before the original button styles):
/* =============================================
 * TW3GreenButton
 * ============================================= */

.TW3GreenButton {
    float: left;
    width: 200px;
    height: 50px;
    line-height: 50px;
    background-color: #ddd;
    padding-left: 20px;

    -moz-border-radius:10px;
    -webkit-border-radius:10px;
    border-radius:10px;

    -moz-box-shadow:0 2px 0 #4c9434;
    -webkit-box-shadow:0 2px 0 #4c9434;
    box-shadow:0 2px 0 #4c9434;

    background-image: -webkit-gradient(
        linear,
        left bottom,
        left top,
        color-stop(0, #60B842),
        color-stop(0.85, #7FD13D)
    );
    background-image: -moz-linear-gradient(
        center bottom,
        #60B842 0%,
        #7FD13D 85%
    );

    color:#fff;
    font-family:arial,helvetica,sans-serif;
    font-size:17px;
    font-weight:bold;
    text-shadow:1px 1px 1px #4c9434;
}

.TW3GreenButton:hover{
    background-image: -webkit-gradient(
        linear,
        left bottom,
        left top,
        color-stop(0, #6DD14B),
        color-stop(0.85, #85DB40)
    );
    background-image: -moz-linear-gradient(
        center bottom,
        #6DD14B 0%,
        #85DB40 85%
    );
    box-shadow:0 2px 0 #5EA839;
}

.TW3GreenButton:active{
    background-image: -webkit-gradient(
        linear,
        left bottom,
        left top,
        color-stop(0, #6DD14B),
        color-stop(0.85, #85DB40)
    );
    background-image: -moz-linear-gradient(
        center bottom,
        #6DD14B 0%,
        #85DB40 85%
    );
    box-shadow:0 1px 0 #5EA839;
    margin-top: 1px;
}
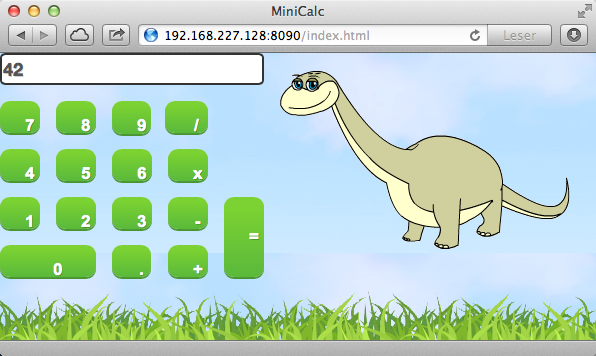
Calc for kids 🙂
Remember to set the correct style for each component.
For the edit component, you can just set the
StyleClass
property to
TW3EditBox
directly.
For the buttons, this can be a tedious job, and you might want to do it the easy way by code:
 for Index := 0 to getChildCount - 1 do
  begin
    Component := getChildObject(Index);
    if (Component is TW3Button) then
      TW3Button(Component).StyleClass := 'TW3GreenButton';
  end;