 With the Raspberry Pi a low cost computer is available that can be used for a great variety of different purposes. The credit-card-sized single-board computer is capable to run Linux, which is available in form of different, custom tailored distributions. Most of them can be extended easily to run node.js, which was presented in-depth in the recent posts.
This article will shed a light on how to install node.js on a Raspberry Pi. It will present some nice ideas about how to get the best out of your Raspberry Pi (& alike). Last but not least the article concludes with some benchmarks to show some limits.
Installing node.js
Now the simplest (but not recommended) way to get Node.js onto your machine is via
sudo apt-get install nodejs
Also, you might want to have the package manager npm installed along via
sudo apt-get install npm
With this you’ll get a basic installation of node.js and npm, which might already be satisfying if you only want to get an idea about how it works. Unfortunately, the version installed by this is only v0.6.19, while the most recent version (at time of writing) is v0.10.24
So in order to get the most out of node.js it is recommended to get a recent version. Since the build of a linux ARM binary lags some numbers behind (or probably is not maintained anymore) the most recent pre-build binary can only be found for version 10.21, which one can get via
wget http://nodejs.org/dist/v0.10.21/node-v0.10.21-linux-arm-pi.tar.gz
To get its content type:
tar xvzf node-v0.10.21-linux-arm-pi.tar.gz
while it can now already be executed with
node-v0.10.21-linux-arm-pi/bin/node
it’s not globally accessible. If you decide to stick with the version you just downloaded & extracted you can now move the entire directory to a more suitable place by calling:
sudo mkdir /opt/node
sudo mv node-v0.10.21-linux-arm-pi/* /opt/node
and add node.js to the path by editing the‘/etc/profile’ configuration file with
sudo nano /etc/profile
to
…
NODE_JS_HOME=”/opt/node”
PATH=”$PATH:$NODE_JS_HOME/bin”
export PATH
…
After a logout / login it should now be globally accessible.
While this is still not the latest version, it should be good enough for everything you might want to do with it.
Doing it the hard way
However, for sake of completeness, here is also a step by step solution, if you want the latest stable or even the bleeding edge version. This needs some further Linux packages, which can be installed with
sudo apt-get update && sudo apt-get upgrade
sudo apt-get install git-core build-essential python libssl-dev nano
Now get the version you want to use via git (e.g 10.24):
sudo git clone https://github.com/joyent/node.git
cd node
sudo git checkout v0.10.24
In the next step we will configure and build node.js, which takes about 3 hours on a typical Raspberry Pi:
sudo ./configure
sudo make
sudo make install
After this you can refer to the steps above to move node to the /opt directory and make it accessible globally. Since we now have the entire source available we can get this done automatically via
python ./tools/install.py
Working with node.js
Regardless of the version you have installed, you should now have node.js installed and accessible from whatever path you are in. Try this by checking its version number via
node -v
Also you can start to add any external packages you like via npm (e.g. socket.io as in part 2 of the mini series about node.js):
npm install socket.io
Now everything should be set-up to work with Smart Mobile Studio. With its latest addition of build scripts you can automatically copy the output to your Raspberry Pi and execute node.js with your script as parameter. Depending on your configuration, this can be solved by calling a batch file, which itself copies the output to a shared network folder and runs node.js via ssh (by using putty).
What can it be used for
The Rasberry Pi has several appealing properties you cannot find in your typical desktop environment. It is
- small
- silent
- cheap
- efficient
While the first two items on this list are out of question, the latter two depend on the context, but more about this later.
However, this alone cannot explain the huge success of the Raspberry Pi. What makes the difference are the interfaces and some add-ons. The build-in network adapter makes it useful as a server, the additional GPU useful for (simple) games. The hardware video decoder makes it suitable as media center and the addition general purpose I/Os come handy in all sorts of automation tasks.
But let’s dig into this in more detail:
Server
Since the network adapter is connected over the USB bus, it is limited to only 480 Mbits/s. Taking away some USB overhead (as it is shared with other peripherals) it comes down to about 15 MB/s (only slightly higher than fast ethernet, which has about 12.5 MB/s). This makes the server only useful in limited scenarios (private use, small companies etc.).
Media Center
Although some video codecs must be licensed separately, the Raspberry Pi is still the cheapest and most versatile solution for media playback available at the moment. With the help of the build in video decoders, the Raspberry Pi can render most files in HD quality at ease. The fact that several different distributions are custom tailored for this use case underpins this.
Automation
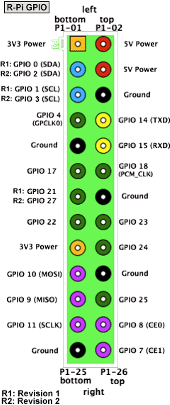
GPIOs
For makers the Raspberry Pi is often the missing link between the high and the low level. While on the one hand it runs Linux, it can be used to access electronics (sensors, servos, LEDs) directly on the other hand. Together with the network and USB interface (for Bluetooth, Wireless and such) it is often used to automate or control simple tasks. For example, it can be used to turn off the lights, when the user starts a movie. Or the other way round a light sensor can start a movie if the light is dimmed… (not to mention the easy way of connecting an IR sensor to access the Raspberry Pi with an ordinary remote control).
Unfortunately there are some limits, since this is not the primary task for this board. The general purpose I/O (GPIO) features one serial (UART) interface, one SPI and one I²C (a second one can be used with rev.2 by soldering an extra header onto the board). It is capable of PWM, but only on one pin at a time. In addition to this some extra functions are available, for example the statuses of the LEDs are accessible and a reset can be forced. Also audio and video data is handled via GPIO and can be hacked.
Due to the fact that Linux itself is not meant for real-time processing, timing is critical with the Raspberry Pi. For this reason, it is not possible to use the Raspberry Pi via node.js to control LEDs based on the WS2811 controller, which means, an additional (micro-) controller for LEDs might be necessary. On the other hand Espruino can be executed on a Raspberry Pi as well to fill this gap.

Other alternatives
Nowadays the Raspberry Pi is not the only small & cheap computer anymore. Several contenders are available, each having slightly different emphases to overcome the limitations of the Raspberry Pi.
Cubietruck as a Server
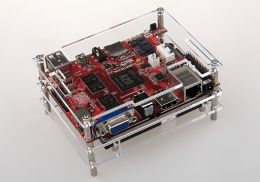 Despite the fact that it costs more than twice as much as a Raspberry Pi, the Cubietruck is ideal for the use as a server. Opposite to the Pi, it features SATA, which allows a fast connection to the storage. The dedicated Gigabit Ethernet and built-in WiFi makes it even suitable as a router.
For about 105$, the user gets a dual core Cortex-A7 processor with 2GB of RAM, which performs up to 4x better in a multithread situation (even not taken the faster GigaBit/SATA access into account).
BeagleBone for automation
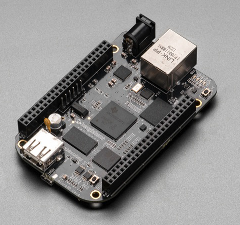 With the BeagleBone Black (the successor of the popular BeagleBoard) a perfect hybrid between a micro-controller and small computer is available. With its 2 x 46 pin sockets (BeagleBoard compatible) nearly everything can be controlled (e.g. via CAN-Bus, known from the automotive industry) and it costs only 10 bucks more than a Pi.
As a bonus, it has its own JavaScript library for node.js (called BoneScript), which comes with several examples accessible online. If space/power consumption is not an issue, this is might be what you ever wanted, when it comes to home automation, tinkering or hacking. On the other hand, it does not contain hardware video decoders, which makes it less useful as a media center.
OLinuXino for the car
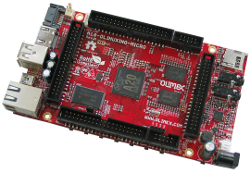 For less than twice as much (65€) as a Raspberry Pi, the OLinuXino A20 is available. It is probably the most versatile contender in the field, as it has a fast processor (1 GHz Cortex-A7) & GPU (Dual Mali-400), SATA, video decoder, extension sockets (for automation). If that is not already enough, it has a wide input voltage range, which allows the direct use on a vehicle input in a car or via a LiPo battery.
In comparison to other boards mentioned here, it has a microphone input. This can be useful for speech recognition.
With the power of open source, this board also comes in different flavors. Instead of the A20 CPU, others (A10, A13) can be ordered. Especially the A13 can be as cheap as 35€, which is in the price segment of a Raspberry Pi.
Cotton Candy for the pocket
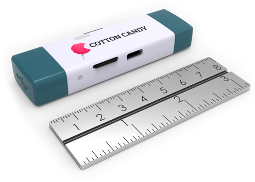 With 199$ the cotton candy probably not the cheapest solution, but the smallest in the field. The computer system comes in the convenient for of a USB stick, with an extra HDMI output. This allows you to stick it directly into any HDMI monitor.
Its Cortex A9 processor with 1.2 GHz is all about performance and thus about four times as fast as the Raspberry Pi. The core is also implemented in the Apple A5 and Nvidia Tegra 2 & 3 (and many more). Despite the small size, it already has WiFi & Bluetooth on board. The Quad-Core Mali 100MP GPU is fast enough to render on nearly every screen connected to the HDMI input.
Benchmarks
As mentioned above the Raspberry Pi appears to be cheap & efficient. However, in fact it relies on the eye of the beholder. If considered the absolute amount for money for a computer compared to a atypical desktop computer this might be true. The same for the efficiency, based on the fact that the Raspberry Pi uses by far less energy for showing a video than a typical desktop computer does. But how is it in particular?
As mentioned above, the Raspberry Pi really wins, when it comes to the role as a media center. You can hardly find any other device that is that cheap and that energy efficient. The latter is due to the fact, that mainly the highly optimized video decoders do the work during the playback of audio. The other hardware is hardly needed and only consumes some watt to keep it running. Since there is no hard disk nor fan to spin, it is even quite quiet compared to a desktop.
However, for our needs we do neither access the video encoders nor the GPU (which is also quite fast when it comes to floating point operation, compared to the CPU). We only make use of the CPU, which is mostly busy compiling and executing the node.js script on the fly. For certain tasks this can be very demanding, which is why we should have a closer look at some benchmarks.
For those who compiled their node.js from source, some benchmarks can be executed from the benchmark subdirectory.
With no claim to be complete, here are some results from the array tests:
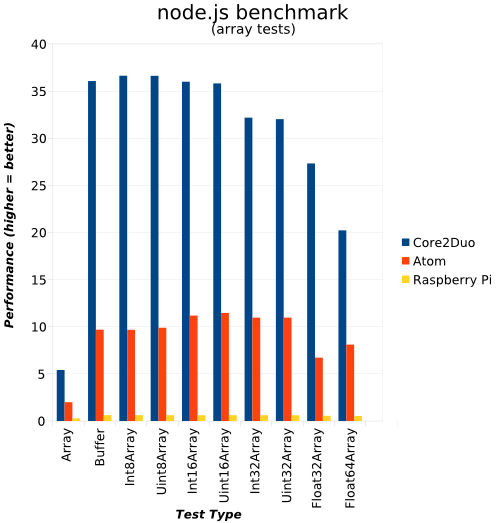
Hands down, the Raspberry Pi has by far the worst performance compared to an Atom processor and a Core2Duo processor (and these themselves were not the latest models). In fact, a desktop processor can easily have 70x more performance than a Raspberry Pi, given the fact that most optimization efforts in the underlying V8 engine were carried out for the Intel based implementations.
Note also, that the CPU used in a Raspberry Pi is an ARM1176, which is based on the ARMv6 architecture, developed in 2002 (more than 10 years ago). While this already uses SIMD, it does not support its advanced extension, known as NEON. Just for comparison, the same processor was used in the first iPhone, the Kindle 2, HTC Hero, Samsung Galaxy 3 and Nokia 808 PureView, just to name a few.
In order to get an idea about the performance of ARM powered systems (any beyond) let’s have a look at the Coremark benchmark, which is known to evaluate the ALU (without the caches) in a way that is good for comparisons of different microprocessors. The values in the below table were taken from an article in German computer magazine c’t. The coremark value was measured with multithreading, which explains why some results are roughly twice as good as others.
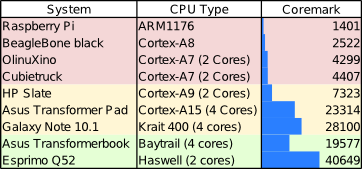
Coremark performance of selected processors (source c’t)
As can be seen, the Raspberry Pi is pretty much on the lower scale and desktop processors are not even taken into account here. It is also interesting, that modern tablets (like the Transformer Pad with its Tegra 4 processor) outperform the Raspberry Pi by a factor of 16. Or in other words: To get the same performance you will need at least 16 Raspberry Pis, which is neither cheap nor efficient anymore. On the other hand you will get 16x video decoders, which will be most of the time in idle for tasks like this benchmark. I guess you got the point…
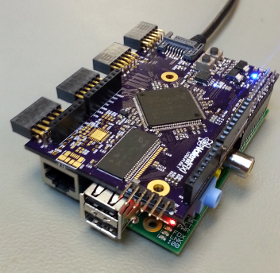 Bearing this in mind, the Raspberry Pi will only be a good choice for simple scripts. Though, if you want to implement a cheap number cruncher with the Raspberry Pi, you better spend some money in extensions like the Logi Pi, a programmable FPGA. But do not ask for node.js support, you probably need to get your hands real dirty here with a low level assembly-language.
Summary
With the Raspberry Pi, a small and cheap system is available, that is in particular useful as a media center. Furthermore, it can perform (additional) automation tasks or act as a small server. The fact that it can be scripted with node.js makes it a good target for Smart Mobile Studio users. Beside the Raspberry Pi other, similar alternatives are available. While being slightly more expensive, they overcome some of the issues, while still being small and cheap. Finally we had a look at the performance and found the processing power to be on the lower end (especially compared to tablets/smartphones, even older ones).
