In our previous articles we covered general concepts related to graphics programming together with basic drawing methods, focusing on those that should be familiar to Delphi programmers. In this article we will investigate double buffering and learn about off-screen bitmaps.
A few words about double buffering
16 bit machines were great
Double buffering simply means that you operate with two screens (or views), one visible and the other hidden. The concept stems from the 80’s and 90’s where programmers had to write pixel data directly to the video hardware, something which had the unfortunate side effect of flickering. In order to even display a picture on the Amiga or Atari machines, you had to tell the hardware the adress of the image data (or ask the BIOS for a fixed segment index). In order to get rid of flickering graphics we had to allocate two screens, display the first, draw to the second – then quickly switch the video buffers (think swapping two cards very quickly, altering only the hidden card).
Thankfully we don’t have to care about the nitty gritty in our day and age. Javascript doesn’t have any obscure pointers, and indeed the browser is already double buffered. The pressure for javascript and smart developers is not to fiddle with esoteric kernel calls, but rather to make sure our graphics is in sync with the browser.
But, before we dive into the how to best update moving graphics under HTML5, let’s have a look at something more immediate. Namely how to display graphics in the first place.
Off-screen bitmaps
What exactly is an off-screen bitmap? Well, in short it’s a surface you can draw to, but it’s held in the computers memory and is thus invisible. You can use off-screen bitmaps to load pictures in the background, pre-render game or demo content, hold animation frames – the uses are endless.
Under Smart Mobile Studio it’s very easy to create an offscreen bitmap:
mBitmap:=TW3GraphicsContext.Create(null);
mBitmap.allocate(100,100);
The above code creates an off-screen bitmap and sets the size to 100 x 100 pixels. Sadly you don’t have any control over the pixel format like we do under Delphi, but all modern browsers operate with strict 32bit graphics (which is the fastest format) so it would be pointless to support older formats.
In order to draw anything on our off-screen bitmap we need a canvas. The canvas class is called TW3Canvas (as opposed to plain TCanvas under Delphi). You initialize a canvas object like this:
mCanvas:=TW3Canvas.Create(mBitmap);
The canvas constructor takes one parameter which has to be a valid graphics context.
One thing I want to mention: although it may be slightly confusing if you are just starting out, is that a graphics context does not have to be invisible. Anything that has a context under HTML5 can be used as a canvas target.
So a graphics context is not synonymous with a hidden, off-screen bitmap – but can also be a visible DOM element. HTML5 even allows you to hook into a controls background and alter it “live” (see TW3BackgroundGraphicContext in w3graphics.pas). But that is a topic for another article i think.
Working with off-screen bitmaps
Now that we know how to create an off-screen bitmap and a canvas, let’s use this knowledge to full effect.
Create a new canvas game project in Smart Mobile Studio, switch to the project tab where the application source is and alter it to the following:
  TApplication = class(TW3CustomGameApplication)
  private
    { Private methods }
    FSprite:  TW3GraphicContext;
    FCanvas:  TW3Canvas;
  protected
    { Protected methods }
    procedure  ApplicationStarting; override;
    procedure  ApplicationClosing; override;
    procedure  PaintView(Canvas: TW3Canvas); override;
  end;
We want to initialize these objects, so we add the following code to the ApplicationStarting method:
procedure TApplication.ApplicationStarting;
begin
  inherited;

  //Create our offscreen bitmap
  FSprite:=TW3GraphicContext.create(null);
  FSprite.Allocate(100,100);

  // Create and connect a canvas to the bitmap
  FCanvas:=TW3Canvas.create(FSprite);

  // Initialize refresh interval, set this to 1 for optimal speed
  GameView.Delay := 20;

  // Start the redraw-cycle with framecounter active
  // Note: the framecounter impacts rendering speed. Disable
  // the framerate for maximum speed (false)
  GameView.StartSession(True);
end;
And we also want to gracefully eliminate the objects when the application terminates:
procedure TApplication.ApplicationClosing;
begin
  GameView.EndSession;

  FCanvas.free;
  FSprite.free;

  inherited;
end;
What we have now is an empty application which creates a 100×100 pixel offscreen bitmap. Lets continue by drawing something to this offscreen bitmap and then display it on our screen. We add a new procedure to our application class:
  TApplication = class(TW3CustomGameApplication)
  private
    ...
    procedure drawSprite;
  protected
    ...
  end;
And we implement it as such:
procedure TApplication.drawSprite;
Begin
  FCanvas.Clear;
  FCanvas.beginpath;

  FCanvas.MoveToF(0,0);
  FCanvas.LineToF(100,100);

  FCanvas.movetoF(100,0);
  FCanvas.linetoF(0,100);

  FCanvas.lineWidth := 5;
  FCanvas.strokeStyle := 'blue';
  FCanvas.stroke();
end;
Now scroll down to the paintview method and add the following lines at the bottom of the procedure:
  DrawSprite;
  Canvas.PutImageData(FCanvas.ToImageData,0,0);
Now compile and run the application, you should now see the following picture on your screen:
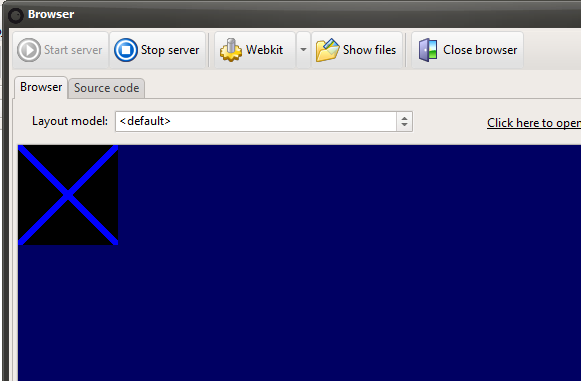
Offscreen bitmap
Making things move
Drawing to an offscreen bitmap and pasting it on the display is not really that amazing, so we need to make things move around and give it a spot of life. Again the rule of thumb is to pre-calculate and pre-render as much as possible.
Here is a little routine to pre-calculate a circle with variable amount of anchor points. It’s a handy little snippet so you may want to paste it into your snippet’s library for future use:
function calcpath(centerX, centerY, radius,
         segments: Integer): TPointArrayF;
var
  i: integer;
  x, y: Float;
begin
  result.SetLength(0);
  for i:=0 to segments-1 do
  Begin
    x:=centerX + Radius * sin(i * 2 * PI / segments);
    y:=centerY + radius * cos(i * 2 * PI / segments);
    result.Add(TPointF.create(x,y));
  end;
end;
Just paste the function below the implementation keyword in the source. Now add the following field in the application class:
  TApplication = class(TW3CustomGameApplication)
  private
    ..
  FPath: TPointArrayF;
  protected
   ..
  end;
We are now ready to pre-calculate a path for our moving object, so we issue a call to calcpath in the ApplicationStarting method:
FPath := calcPath(gameview.width div 2,gameview.height div 2, 200, 12);
This call generates a circle with a radius of 200 pixels from the center of the display, divided into 12 sections (or points on that path). In other words: a clock face.
Now that we have both an offscreen bitmap and a path, let’s make our offscreen bitmap spin around the path, and also display the number (1 through 11) as it moves.For this we need two more variables: one for counting the current index and another for delay. So we add the following to our application object:
  FCounter: Integer;
  FDelay:   Integer;
We also need to alter the drawSprite method to display the current index:
procedure TApplication.drawSprite;
var
  mIndex: Integer;
Begin
  mIndex:=FCounter mod 12;

  FCanvas.Clear;
  FCanvas.beginpath;

  FCanvas.MoveToF(0,0);
  FCanvas.LineToF(100,100);

  FCanvas.movetoF(100,0);
  FCanvas.linetoF(0,100);

  FCanvas.lineWidth := 5;
  FCanvas.strokeStyle := 'blue';
  FCanvas.stroke();

  FCanvas.FillStyle:="white";
  FCanvas.Font:="bold 64px Arial";
  FCanvas.FillText(IntToStr(mIndex),
  (FSprite.width div 2) - 16,
  (FSprite.Height div 2) + 16);
end;
And finally we alter the paintview method. I also took the liberty to add a “fade” effect to the mix. By filling the canvas with 0.1 opacity you gradually erase whatever graphics is there over several frames. Here is the procedure so far:
procedure TApplication.PaintView;
var
  x:      Integer;
  mIndex: Integer;
begin

  // clear background with opacity
  canvas.fillstyle:='rgba(0,0,99,0.1)';
  canvas.fillrectF(0,0,gameview.width,gameview.height);

  // Draw our framerate on the screen
  Canvas.Font := '10pt verdana';
  Canvas.FillStyle := 'rgb(255, 255, 255)';
  Canvas.FillTextF('FPS:' + IntToStr(GameView.FrameRate), 10, 20, MAX_INT);

  inc(FDelay);
  if (FDelay mod 20) = 19 then
    inc(FCounter);

  mIndex := FCounter mod 12;

  // plot the path points just for fun
  Canvas.lineWidth := 5;
  Canvas.strokeStyle := 'red';
  canvas.beginpath;
  for x:=0 to FPath.Length-1 do
  Begin
    canvas.MoveToF(FPath[x].x,FPath[x].y);
    canvas.linetoF(FPath[x].x + 5,FPath[x].y);
  end;
  canvas.stroke;

  // update the sprite graphics
  DrawSprite;

  // draw the sprite at the current path point
  Canvas.PutImageData(FCanvas.ToImageData,
  FPath[11-mIndex].x - (FSprite.Width div 2),
  FPath[11-mIndex].y - (FSprite.Height div 2));
end;
When we execute the project the result is a bitmap that moves according to our path, displaying the index number as it moves along.
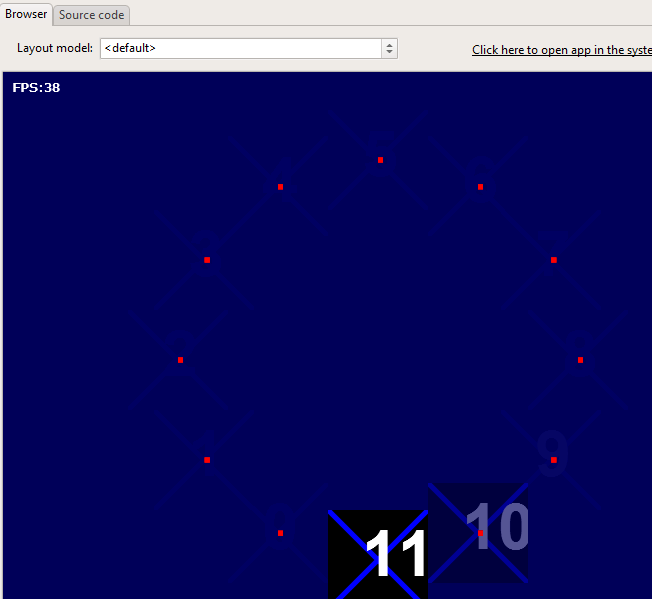
Our spinning counter
Synchronizing
So far we have been exploring some very basic programming techniques. It’s time to take it to the next level and make our graphics more browser friendly.
In the beginning of this article I mentioned double buffering and that the pressure for javascript and Smart Mobile Studio developers is to draw the graphics in sync with the browser.
In order to achieve that we have to import and use a low-level javascript method called requestAnimationFrame. This method is not yet wrapped by Smart Mobile Studio so need to inform the compiler about it’s name, it’s syntax and that it is in fact an external method.
We import the method as such:
procedure webkitRequestAnimationFrame(const aRef:TProcedureRef);external;
The requestAnimationFrame procedure is very simple. It takes one parameter which is a procedure reference, and the browser will then call that procedure in time for the next screen update.
So what we do is move all our drawing code out of the paintView method into a secondary procedure, and then use the requestAnimationFrame call to make our graphics update in sync with the browser.
So the paintview method is reduced to:
procedure TApplication.PaintView(Canvas: TW3Canvas);
begin
  inc(FDelay);
  if (FDelay mod 20)=19 then
  inc(FCounter);

  If FFirst then
  Begin
    FFirst:=False;
    webkitRequestAnimationFrame(@DrawScene);
  end;
end;
And we isolate the drawing code in a new method:
Procedure TApplication.DrawScene;
var
  x:      Integer;
  mIndex: Integer;
  Canvas: TW3Canvas;
begin

  mIndex:=FCounter mod 12;

  Canvas:=Gameview.canvas;

  // clear background with opacity
  canvas.fillstyle:='rgba(0,0,99,0.1)';
  canvas.fillrectF(0,0,gameview.width,gameview.height);

  // Draw our framerate on the screen
  Canvas.Font := '10pt verdana';
  Canvas.FillStyle := 'rgb(255, 255, 255)';
  Canvas.FillTextF('FPS:' + IntToStr(GameView.FrameRate), 10, 20, MAX_INT);

  // plot the path points just for fun
  Canvas.lineWidth := 5;
  Canvas.strokeStyle := 'red';
  canvas.beginpath;
  for x:=0 to FPath.Length-1 do
  Begin
    canvas.MoveToF(FPath[x].x,FPath[x].y);
    canvas.linetoF(FPath[x].x + 5,FPath[x].y);
  end;
  canvas.stroke;

  // update the sprite graphics
  DrawSprite;

  // draw the sprite at the current path point
  Canvas.PutImageData(FCanvas.ToImageData,
  FPath[11-mIndex].x - (FSprite.Width div 2),
  FPath[11-mIndex].y - (FSprite.Height div 2));

  if not application.Terminated
  and gameview.Active then
  webkitRequestAnimationFrame(@DrawScene);
end;
Summary
In this article we have covered quite a bit of losely related topics. I have tried to include avenues of code that can be easily expanded upon later – and also to provide what you need to get going straight away.
Naturally the code presented here can be greatly optimized. I have keept the code as easy on the eyes as brewity allows.
In the next installment of this article we will take on pictures, how to load them, copy them around – and opacity/alpha blending.
Download the project file (.opp) for this article here: Project13