 With version 2.0 we have spent some precious development time into a new package manager. Similar to other solutions it allows to separate components into packages that can be independently installed in the IDE. Although there is no imminent need for it right now, it opens the IDE for 3rd party and user components that can be integrated into the RAD environment easily.
 While there is still some work ahead to iron out some teething problems in the upcoming beta version, it is already used in combination with the new visual designer and its basic set of components, called the “Smart Component Library” (SCL). In addition to the basic set of components, two additional 3rd party packages are shipped with the product TeeChart.spk (by Steema Software) and Grid.spk (by Berg Software). The packages are built to integrate neat-less into the IDE’s component palette.
Furthermore we added an example package called W3Slider.spk with embedded source code. It is designed according to the all-in-one-file approach, that can also be used for the project. With packages designed like this, installation can be as easy as dropping the spk file to the ‘Packages’ folder. In the future we will also add support for encrypted package source code, so that it is possible to build closed source packages.
Implementation Details
While the amount of changes (compared to Version 1.x) in this regards seem to be very little, it meant infact to rewrite the entire chain of handling components (in the component palette, visual designer & property inspector) from scratch. Previously all components were “hard coded” in Delphi, which means for every new component we added, we needed to update the component palette, add a dedicated Delphi component for the visual designer & property inspector, convert from Delphi to DWS at compile time and handle property storage in form file. All this code was convoluted in several manners and one couldn’t change one part without affecting other parts in the IDE.
Since we wanted to rewrite the visual designer, we had to rewrite the entire package system as well. Despite the fact that the development of version 2.0 took longer than expected, we now have a system that is perfectly decoupled in the aspects of package manager, visual designer, component palette, property inspector and form handling. It will allow us to maintain and improve each aspect separately. Also it will be possible for us in the future to switch to a JavaScript powered designer, which might allow you to create your layout on the destination device (e.g. iPhone) directly. This allows you to let a designer or even the management redesign the GUI remotely while you can focus on the code…
 But let’s stick on what we have now, let’s stay on topic! The packages are basically in a similar XML format as your projects, which means you can – in case of emergencies – edit (and eventually fix) the packages at any time. This can be quite useful, since at the moment the GUI part of the package manager is limited to the essentials. For example it’s not possible at the moment to specify different categories for different components in one package. So far you may only specify one category per package, while the packages would allow an even more detailed specification of categories (per component). Also it’s not yet possible to change/specify icons for a component other than by editing the package files.
But of course you don’t need to know all the details if you only want to work with the packages, so let’s move on to the next chapter.
Package installation / usage
 The installation of packages is very easy. All you need to do is to drop the package to the ‘Packages’ subdirectory.
Note that it might also be necessary to add glyphs for the component palette to the glyphs directory, but that depends whether the icons are specified internally or externally. At the moment a basic set of (external) glyphs is shipped with the product. We decided to make them available externally, so you can change them anytime to your favorite set of icons (the current icons are not always as clear as possible).
Once you have added/removed a package to the package subdirectory you have to restart the IDE in order to get the packages enumerated and listed in the component palette. If you have deleted a package, it will remain in the IDE’s cache until you restart the IDE.
After the packages have been installed, you can use the components in the same manner as you used the components in version 1.x.
Package creation
Now eventually you also want to build your own custom packages, which is also basically supported already in version 2.0 (beta). In fact the existing packages were created via the IDE, with some minor modifications in a text editor.
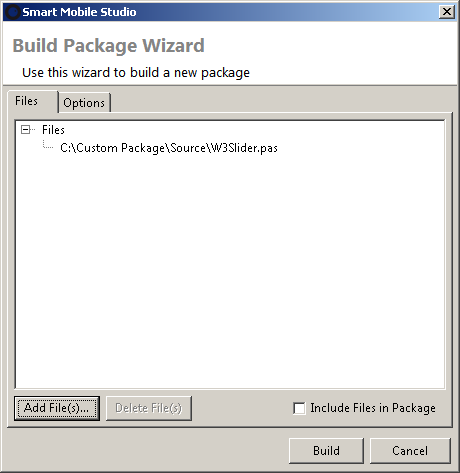
To build a package, you need to open the dialog from the main menu Package->Build Package. The dialog contains two tabs, where in the first one the package files must be specified. In this example we’d like to use only one pascal source file named W3Slider.pas as shown in the screenshot.

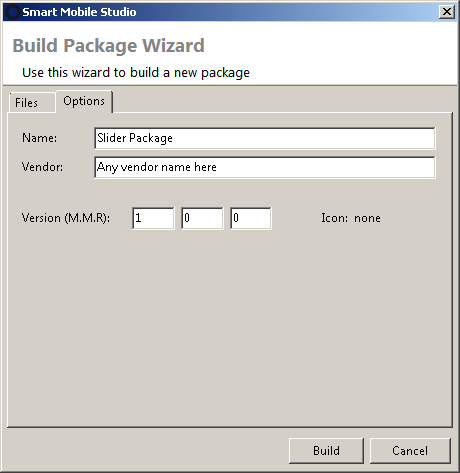
In the second tab further information and options can be specified for the package.

After that we can already build the package by clicking ‘Build’. After that the entire package is compiled to ensure it works after installation. If the package does not compile, please ensure that the specified units work in Smart Mobile Studio in general (by adding the units to an empty project). The package compiler will not report issues with the compiled package at the moment.
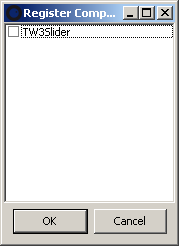
After the package has been verified to work we can choose the components that should be available in the visual designer. While we plan to have source support for this (like in Delphi the ‘RegisterComponents’ procedure), it’s not yet available. At the moment the components must be chosen from a simple list like this:

By default all components are build with the category ‘Samples’, which might not be what you desire. We hope to make the list more customizable, so that the package author can specify the categories without using a text editor (which is still necessary at the moment).
After everything has been specified, a save dialog is shown to store that package. If you save it in the ‘Packages’ subdirectory of the IDE, it will already be available the next time you start the IDE. Otherwise you either have to copy it to that directory manually or use the “Add Package” menu item. Alternatively it is possible to “Manage Packages”. From that dialog it’s also possible to add/remove all packages used by the IDE.
There’s still a lot of work left for us, but the basics are already covered. With version 3.0 we plan to add a public package repository, from where you can upload and download new packages from the IDE. Until then the package manager should be fully working.
