Smart Mobile Studio
  • News
  • Forums
  • Download
  • Store
  • Showcases
    • Featured demos
    • The Smart Contest 2013, Round 1 – Graphics
  • Documentation
    • Get the book
    • System requirements
    • Prerequisites
    • Getting started
      • Introduction
      • Application architecture
      • The application object
      • Forms and navigation
      • Message dialogs
      • Themes and styles
    • Project types
      • Visual project
      • Game project
      • Console project
    • Layout manager
    • Networking
      • TW3HttpRequest
      • TW3JSONP
      • Loading files
  • About

Tag Archives: CSS

Playing with the design

Posted on 03.06.2013 by Jørn E. Angeltveit Posted in Developers log, Documentation, News

There was a question about “adjusting the background color of a form” a while ago. There are actually several ways to adjust the background color of a form, and one should know how Smart works on this area to be able to give the app you’re working on a visual face lift.
Since the various methods might interfere with each-other, it’s important to know the dependencies between the various methods. For example, if you set color by code in the OnCreate method, this will ignore the color in the Object Inspector…

I’ll go trough the various methods by using the classical “Calc (by Eric Grange)” demo in the Demos folder.
Continue reading→

CSS design forms how-to tutorial

Smart Mobile Studio 1.1 RC (build 1.1.0.400)

Posted on 15.02.2013 by Smart Mobile Studio Team Posted in News

We are very proud to present the release candidate for Smart Mobile Studio version 1.1  (build number v1.1.0.400). If you would like to give this groundbreaking product a test drive before we officially release it, then you can download the installer directly from SmartMobileStudio.com/download/setup_v1_1_0_400_rc.exe


(The context menu is replaced with Ctrl+Shift+R (start/stop recording) and Ctrl+Shift+P (replay the recorded macro).

We have done a lot of improvements in the IDE, the editor, the RTL and the Smart Pascal language. Below is a list of some of the improvements that have been done since version 1.0 (see full manifest of changes for beta 1 here).

IDE changes

  • Added: Support for external form files
  • Added: Navigate to ancestor from class-browser
  • Added: Components are now organized in more tabs
  • Added: RTL source proxy, speeds up compilation and dependency chain
  • Added: Syntax hints and improved code insight
  • Added: The IDE now uses threading to handle background compilation
  • Added: Dependencies for controls are automatically added to the uses clause
  • Fixed: Resizer bugs for nested controls
  • Fixed: Scrolling issue fixed ([CTRL] + [Up]/[Down])
  • Fixed: Disabled unit structure flickering
  • Fixed: LineCount issue
  • Fixed: Case fix for strict hints
  • Fixed: A label “mistake” in the baseframe (it was renamed further up the chain).
  • Fixed: modified [CTRL]+/ to work the same as in Delphi:
    • if a single line is changed, caret is moved to the next line (current column is preserved)
    • if multiple lines are selected, comment is toggled for the whole block and caret is move to the line following the block (current column is set to 1)
    • modification is placed into the undo buffer so that it can be undone
  • Altered: [CTRL]+[/] is replaced by [CTRL]+[#] for systems where [/] is only accessible via [SHIFT]
  • Altered: Minor changes on compiler output (bulk output of errors, warnings and hints).
  • Altered: Search and replace dialog remembers the last states
  • Altered: improved code proposal (insert item highlight)
  • Altered: dialogs are centered
  • Altered: Recent file on welcome tab now supports to show unlimited entries if desired (by default limited to 10 items)
  • Added: Pascal “Gabelou” StyleCop (see prefrences->misc. to enable it).
  • Added: Rename refactoring (including closed files)
  • Added ‘Format Keywords’ action (see popup menu), which translates all keywords to lowercase.
  • Added: Simplified BrowserAPI
  • Added: possibility to filter log messages from the console output (filtered ‘event.layerX and event.layerY are broken and deprecated …’ by default). Select a certain text to filter and right click -> Ignore Message to filter out all messages containing this particular string. The filter will be resetted on restart.

RTL

  • Updated: Remobjects headers
  • Updated: WebGL headers
  • Updated: Sprite3d
  • Added: DrawTo, DrawPart and misc CODEF functions added to TW3Canvas
  • Added: TW3Progressbar control
  • Added: TW3ListBox control
  • Added: Unit for complex numbers (w3complex.pas)
  • Minor formating and added overload function for CreateImageData
  • Added fast sequential read text file loaders
  • Applied the new ‘Format Keywords’ to the remaining RTL files
  • Removed duplicate & tweaked hash function
  • Improved hashing function
  • dialogs need custom initialization
    • modal dialog support integrated into TW3CustomApplication (ShowModal, HideModal)
    • modal dialog is re-centered if application is resized (for example when orientation of a mobile device changes)
    • added  TW3CustomApplication.CreateOpaqueMask
    • TW3CustomControl.getMaxZIndex is now public
    • modal dialogs triggered from modal dialogs are now supported
  • Fixed: zIndex issues with modal dialogs
  • Fixed: opaque layer has high z-index to cover all controls on the form
  • Fixed: SendToBack
  • Altered: dialogs are centered on the form
  • Altered: event handlers are only called when assigned
  • Altered: W3ModalDialog made external for easier reuse
  • Altered: updated Remobjects interface
  • Altered: Changed default Mouse event X,Y coordinates
  • Added: W3ModalDialog uses opaque div to block owner form (tnx to Eric)
  • Added: PixelRatio info
  • Added TVariant.Properties + OwnProperties
  • Added HorzLine/VertLine
  • Added: New FillRectF/StrokeRectF overloads
  • Added: TW3CustomApplication.FormByName, TW3Component.ChildByName, TW3Component.EnumChildrenAltered: SetSize now virtual
  • Added: PhoneGapAPI is now complete

COMPILER

  • Added: Support for RTTI (!)
  • Added: Support for property expressions
  • Added: Support for interface expressions
  • Fixed: Case fixes for strict mode
  • Fixed: an issue where compiler would accept method implementations in a different unit the class was declared
  • Fixed: Lambdas don’t have a “var”/”const”/etc. section
  • Fixed: issue with invalid symbol table in suggestions in case of fatal error in a lambda
  • Fixed: SymbolDictionary bug for forwarded overloaded methods
  • Fixed: calling overloaded inherited constructors
  • Fixed: codegen for assignments of a function’s result to a var param
  • Fixed: timestamp is now up to date
  • Updated: now uses latest compiler core
  • Updated: tokenizer updated to latest revision
  • Altered: Compile speed optimizations
  • Added: Missing semi-colon no longer a stopping error
  • Added: JSON to reserved names
  • Added: JSON static class
  • Added: Preparation for source maps

DEMOS

  • Fixed: style bug in smartflow
  • Fixed: bug in spartacus
  • Fixed: bug in box2d wrapper
  • Altered: Tested all demos (with exception of gyro). All demos now compile.
  • Altered: formatting of Archimedes Spiral
  • Added: frames demo
  • Added: modal dialog example

Sincerely,
Jon Lennart Aasenden
—
The Smart Mobile Studio Team

Android announcement Apple candidate compiler CSS HTML5 javascript Object Pascal OP4JS Pascal release Smart Mobile Studio w3C webkit

Bling up your apps

Posted on 18.02.2012 by Jon Lennart Posted in Documentation 2 Comments

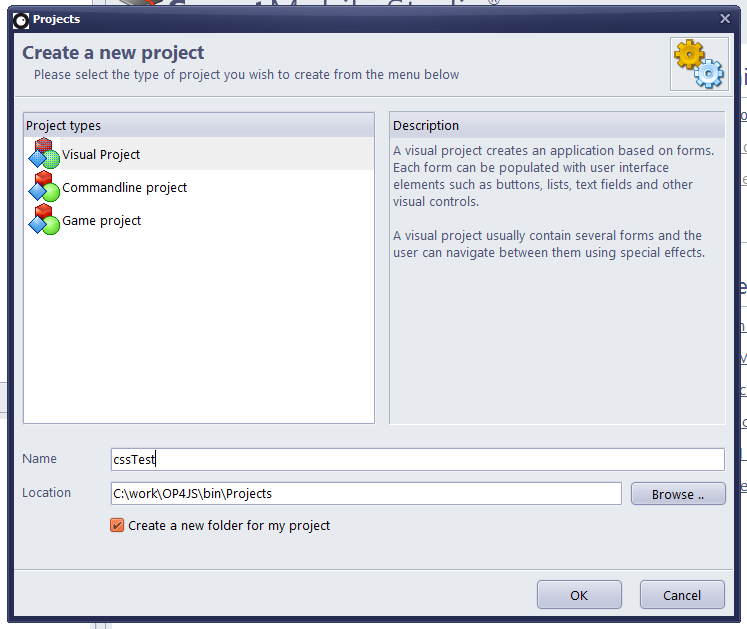
Today we are going to visit the wonderful world of webkit animations. I’m going to demonstrate how you can use relatively simple CSS animations to bring your application to life. So start up Smart Mobile Studio and let’s get cracking! We begin by creating a brand new visual project. This is because we want to make use of visual controls rather than drawing stuff directly to the screen ourselves. So start by creating clicking on the “New project” button and fill in a suitable name.

Remember to select the right project type

Remember to select the right project type

Editing the CSS is easy

Editing the CSS is easy

Setting up the animation

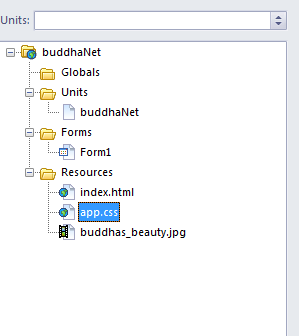
Next step is to define the actual animation. This requires some knowledge of CSS but to be honest, it’s very easy and you will find tons of examples and pre-defined effects online. To define our animation first double-click on the “app.css” file in the project treeview. The file opens and you can edit the CSS.

Note: if you are having problems understanding CSS or lack the inspiration to come up with something unique – a great place to find ready made snippets to use is over at CSS Tricks. This is an awsome website with examples for pretty much every effect under the sun. So it’s well worth the visit.

So now comes the fun part – namely: what sort of animation do we want to create? Well, when my app starts I want it to load a picture and then quickly fade this picture into view. I also want it to scale from very small to normal size. This effect sort of comes at you out of nowhere, so a fitting name is “in your face”. So let’s define the animation:

@-webkit-keyframes InYourFace {
  0% {
    opacity: 0.1;
    -webkit-transform: scale(0.1);
  }
  100% {
    opacity: 1.0;
    -webkit-transform: scale(1.0);
  }
}

As you can see above the animation is defined in C style, using curly brackets. It has two sections, one called 0% and another called 100%. These two sections basically represent the state of the object from beginning to end. You can also add as many sections as you like, in which case the sections become “key frames” (hence the tagname). How fast the keyframes play out depends on the duration property you set (see sourcecode example below). So in the CSS above we animate both the opacity of the object from barely visible to normal visibility, and also the scale of the object from 0.1 to 1.0 (which is the same as 100%).

Setting up the animation code

Next, we are going to need a picture to play with, so i’ve added a picture to my project (Buddhas_beauty.jpg), just find a picture that you want to play around with and add it to the project. You do this by right-clicking on the resources node in the project treeview, clicking “add resource file” from the pop-up menu.

Next, double-click on the file “form1”, which brings up the object pascal code for your form. This form is automatically created by the IDE for you – so you dont need to write it all yourself. We will be adding an image and an animation player object. We will also override a couple of methods to trigger the animation at the right time. Here is the interface section of our form:

  TForm1=class(TW3form)
  private
   { Private methods }
    FImage:   TW3Image;
    FAnim:    TW3NamedAnimation;
    Procedure HandleImageLoaded(Sender:TObject);
  protected
    { Protected methods }
    Procedure InitializeObject;override;
    Procedure FinalizeObject;override;
    Procedure StyleTagObject;override;
    Procedure ReSize;override;
  end;

In the constructor (InitializeObject) we setup the objects we want to use. This is more or less identical to ordinary Delphi, except for the names of-course which has been obscured to protect the binary otherwise located (that was a joke).

  Procedure TForm1.InitializeObject;
  Begin
    inherited;
    (* setup the image *)
    FImage:=TW3Image.Create(self);
    FImage.Visible:=False;
    FImage.OnLoad:=HandleImageLoaded;
    FImage.LoadFromURL('/res/buddhas_beauty.jpg');

    (* setup the effect for our image *)
    FAnim:=TW3NamedAnimation.Create;

    (* and tell the object the CSS name *)
    FAnim.AnimName:='InYourFace';
  End;

  Procedure TForm1.FinalizeObject;
  Begin
    FImage.free;
    FAnim.free;
    inherited;
  End;

Since Javascript is “non blocking” we have to use events to know when a picture has loaded. So to make it short – that’s when we want to trigger our animation. If we tried it before the image was ready we would get an error (or, depending on the object state, nothing would happen).

  Procedure TForm1.HandleImageLoaded(Sender:TObject);
  Begin
    (* image is loaded, now start the effect & make it visible *)
    FAnim.Duration:=0.2;
    FAnim.Execute(FImage);
    FImage.Visible:=True;
  end;

The rest of the code is fairly self describing, especially if you have been following our other examples. The rules are simple: position your controls in the resize method and set styles in the StyleTagObject method. Some rules can be broken and others bent – but these are the ground rules for the VJL.

  Procedure TForm1.StyleTagObject;
  Begin
    inherited;
    StyleClass:='TW3CustomForm';
  End;

  Procedure TForm1.ReSize;
  Begin
    inherited;
    (* position image *)
    FImage.setBounds(10,10,width-20,height-20);
  end;

Another way to trigger an animation on an object is to go low-level. You can for instance run an animation forever using a simple style call as such:

w3_setStyle(FHeader.TagRef,'-webkit-animation',
'TitleGrow 1s infinite alternate');

The above code will execute an animation called “titlegrow” forever. But ofcourse you lose the high level benefits of a pascal interface and also no event callbacks. But if you just want something to move up and down, or some other transformation – then the above one-liner will do the trick.

The final result

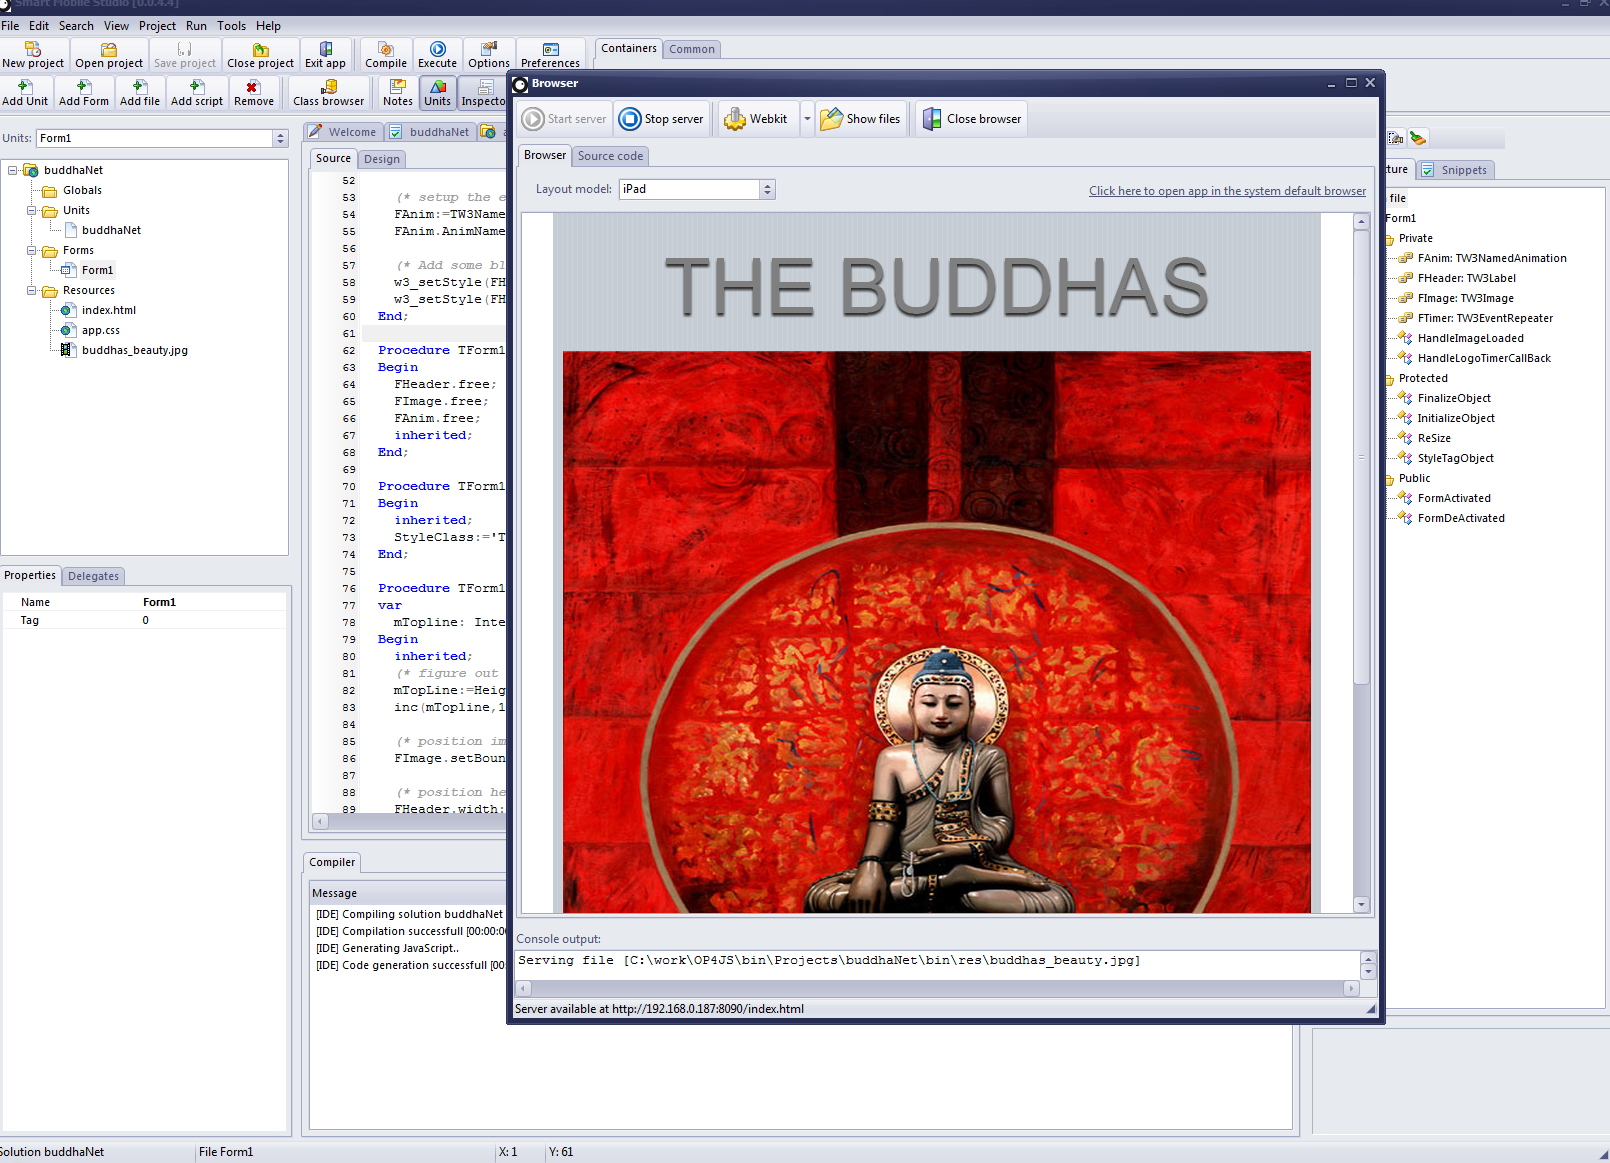
Sadly I cant show you a video of the output, but it works just as expected. The application executes, loads the picture – and when the picture is loaded it scales at you out of nowhere into full size (I later added a label to the top of the display). Click here to download the project

Animations are super easy

Animations are super easy

Here is the same app running in iPad mode. I added some simple resize code to make the font scale with the size of the display. Not bad for less than 5 minutes of coding! Put that in your pipe and smoke it Macromedia 😉

iPad galore, anyone for an e-book?

iPad galore, anyone for an e-book? Click for full size image

animation CSS tutorial

Your first OP4JS custom control

Posted on 05.10.2011 by Jon Lennart Posted in Documentation 1 Comment
There is a lot of work behind OP4JS

About 0.1% of the total OP4JS RTL system

Since the basic framework is nearing completion at high speed (although some modifications might appear) I thought it could be interesting to demonstrate how to create your very own custom control under OP4JS.

In the Delphi world there are two archetypal programmers: Those that stick to the high level interface of Delphi, meaning that they only use pre-made controls and rarely go beneath the bonnet so to speak – and the second group which create components, packages and love to fiddle around with low-level coding. This type of stereotyping is something more or less unique to RAD languages (which would include Delphi, Lazarus, Visual Basic, Real Basic and languages that are “design” based). In more mature languages like C++, Delphi (yes delphi is just as low level as the C++) or C# low-level work is almost unavoidable. But with Object Pascal you at least have a choice (!)

With OP4JS we have tried to retain much of the HLA (high level abstraction) of Delphi, but the system demands that if you want something unique – you have to create your own controls in order to stand out. If not, you might as well go with the many template-based “app machines” out there that produce programs that all look and feel the same.

The basics of a control

There are two types of controls you can create under OP4JS: Graphical controls and ordinary parent/child controls (like you are used to from Delphi). A graphical control is an object that contains a HTML5 graphics context and canvas, which means you have to draw it yourself. This is good for things like games, charts or anything that cant be represented using “normal” html.

The second type, which is the one 90% of all the standard controls that ship with OP4JS derive from, is TCustomControl. So let’s have a look at how setting up a fancy iPhone header looks like:


type

TW3HeaderControl = Class(TCustomControl)
private
  FLabel:     TLabel;
  FBackBtn:   TW3ToolButton;
  FNextBtn:   TW3ToolButton;
Protected
  Procedure   Resize;Override;
protected
  Procedure   InitializeObject;override;
  Procedure   FinalizeObject;override;
  Procedure   StyleTagObject;override;
End;

Under Delphi you would probably expect to see a constructor and destructor in the above code, but under OP4JS we try to synchronize the number of steps taken to establish a control (i.e number of resize and position operations). So to solve this we have introduced 3 new methods: InitializeObject, FinalizeObject and StyleTagObject. As the names imply you create any sub-controls and initialize your variables in InitializeObject (just think of it as your constructor), you destroy those instances in FinalizeObject, and you apply any extra styling or property alteration in the StyleTagObject method.

Clever styling

When a control is in the state of creation, it automatically set it’s own style class (think html here) to the name of it’s class. So in order to give our little control a nice look – we edit the default style sheet (this is automatically created when you create a new application) and make it look like a true iPhone header. The rule of thumb is: The name of the CSS class always matches the name of the OP4JS control:

.TW3HeaderControl
{
	background-image:-webkit-gradient(linear, left top, left bottom,
		from(#b2bbca),
		color-stop(0.25, #a7b0c3),
		color-stop(0.5, #909cb3),
		color-stop(0.5, #8593ac),
		color-stop(0.75, #7c8ba5),
		to(#73839f));
	border-top: 1px solid #cdd5df;
	border-bottom: 1px solid #2d3642;
	-webkit-box-shadow: rgba(33, 33, 33, 0.2) 0px 1px 1px;
}

Adding behavior

If you don’t know anything about CSS or HTML, don’t worry, you can always copy a style you like from the default skin, and there are plenty of examples around the Internet to learn from (or just get a good book, that would save you a lot of time). OK now we need to add some code to our unit to make it come alive:

Procedure TW3HeaderControl.InitializeObject;
Begin
  inherited;
  FLabel:=TLabel.Create(self);
  FLabel.BorderStyle:=bsDotted;
end;

Procedure TW3HeaderControl.FinalizeObject;
Begin
  FLabel.free;

  if assigned(FBackBtn) then
  FBackBtn.free;

  if assigned(FNextBtn) then
  FNextBtn.free;

  inherited;
end;

Procedure TW3HeaderControl.StyleTagObject;
Begin
  inherited StyleTagObject;
end;

Procedure TW3HeaderControl.Resize;
var
  wd,hd:  Integer;
  mTemp:  Integer;
  dx:     Integer;
Begin
  wd:=Width;
  hd:=Height;

  mTemp:=wd;
  dx:=4;
  dec(mTemp,4); //left margin
  dec(mTemp,4); //Right margin

  if  assigned(FBackBtn)
  and (FBackBtn.Visible) then
  Begin
    //space between "back" & label
    dec(mTemp,FBackBtn.width);
    dec(mTemp,2);

    //offset the left edge of the label
    inc(dx,FBackBtn.Width);
    inc(dx,2);

    // position the back-button
    FBackBtn.Left:=4;
    FBackBtn.Top:=4;
  end;

  if  assigned(FNextBtn)
  and (FNextBtn.Visible) then
  Begin
    //space between label & "next" button
    dec(mTemp,FNextBtn.width);
    dec(mTemp,2);
    FNextBtn.Left:=mTemp;
    FNextBtn.Top:=4;
  end;

  FLabel.left:=dx;
  FLabel.top:=4;
  FLabel.Width:=mTemp;
  FLabel.Height:=Height-8;
end;

Why all that code? First of all because it’s just a quick example and secondly, because a typical iPhone header have 3 parts: A back button, a next button and some text in the middle. The above code checks to see if you actually have created a back or next button and shrinks the text area accordingly. Let’s see how it looks so far:

That was easy enough

That was easy enough

I have set the label to have a dotted frame just to make it easier to work with, we will of-course remove the frame all together later. But now, let’s add some more methods to the class interface. We want to expose the label object to give the user access to it’s full capabilities (caption, font, background, orientation and all the rest), and we also want both back and next buttons.

But, we want to keep resources to a bare minimum, so we will use the old “need” trick and only create the buttons when asked for. So the buttons will only be created when you access them:

TW3HeaderControl = Class(TCustomControl)
private
  FLabel:     TLabel;
  FBackBtn:   TW3ToolButton;
  FNextBtn:   TW3ToolButton;
  procedure   ReleaseButtons;
  Procedure   NeedBackButton;
  Procedure   NeedNextButton;
  function    getBackButton:TW3ToolButton;
  function    getNextButton:TW3ToolButton;
protected
  Procedure   Resize;Override;
protected
  Procedure   InitializeObject;override;
  Procedure   FinalizeObject;override;
  Procedure   StyleTagObject;override;
public
  Property    BackButton:TW3ToolButton read getBackButton;
  Property    NextButton:TW3ToolButton read getNextButton;
  property    Title:TLabel read FLabel;
  Property    Options:TW3HeaderButtonOptions read FOptions write setOptions;
End;

And the implementation for our new methods are (this is just a quick example):

Procedure TW3HeaderControl.NeedBackButton;
Begin
  // Create object on the fly if required
  if not assigned(FBackBtn) then
  Begin
    BeginUpdate;
    FBackBtn:=TW3ToolButton.Create(Self);
    SetReSized;
    EndUpdate;
  end;
end;

Procedure TW3HeaderControl.NeedNextButton;
Begin
  // Create object on the fly if required
  if not assigned(FNextbtn) then
  Begin
    BeginUpdate;
    FNextbtn:=TW3ToolButton.Create(Self);
    SetReSized;
    EndUpdate;
  end;
end;

function TW3HeaderControl.getBackButton:TW3ToolButton;
Begin
  NeedBackButton;
  result:=FBackBtn;
end;

function TW3HeaderControl.getNextButton:TW3ToolButton;
Begin
  NeedNextButton;
  result:=FNextBtn;
end;

procedure TW3HeaderControl.ReleaseButtons;
Begin
  if assigned(FBackBtn) then
  Begin
    FBackBtn.free;
    FBackBtn:=NIL;
  end;

  if assigned(FBackBtn) then
  Begin
    FNextBtn.free;
    FNextBtn:=NIL;
  end;
end;

The final product

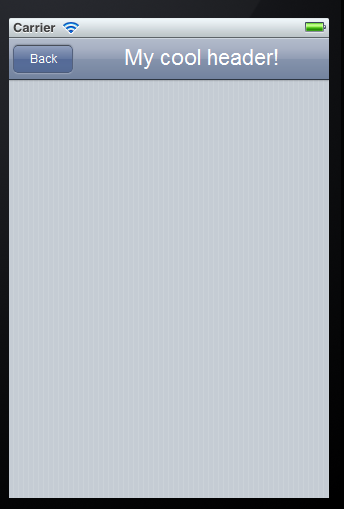
To use our new control, all we have to write (in our Form’s InitializeObject for instance) is something like:

FMyCoolHeader:=TW3HeaderControl.Create(self);
FMyCoolHeader.BackButton.Caption:='Back';
FMyCoolHeader.BackButton.onClick:=HandleBackButtonClicked;
FMyCoolHeader.Title.Caption:='My cool header!';

And voila – we have a nifty iPhone header that looks and feels like the real thing 🙂

Easy but effective

Easy but effective

Notes and addendum

This example is very, very simple. It was put together in 5 minutes just to demonstrate how easy it is to get going and is in no-way an example of code quality or approach. I can think of 1000 ways of making a better header control (the one that ships with OP4JS has a lot more code and does not create buttons this way, and yes — exceptions and error handling is a must).

CSS graphics iOS Smart Mobile Studio tutorial

Inline graphics, orientation and animations

Posted on 20.09.2011 by Jon Lennart Posted in News and articles 5 Comments
CSS based chevrons

CSS based chevrons

This week we are seeing some very cool ideas finally maturing onto the visual canvas. First and foremost: inline graphics. Under the traditional HTML paradigm resources such as images or soundfiles were always losely bound external entities. So before an image could be used it naturally had to download its content from a webserver or read it from a local file. But under HTML5 all of that goes out the window, because now you can embed your graphics as Base64 encoded characters. In short: transform your graphics into text and they can be applied anywhere.

So today our TW3MenuListItem class got automatic support for inline glyphs. The default glyph is of-course the ordinary iPhone chevron picture, but when TImageList is done you will be able to apply just about anything. Since this is HTML5 you can also make use of your styles to add further “bling” to your elements – but we will leave that part up to you. Our job is to deliver a system with the basic iOS widgets ready – but object pascal style, which means easy to use, easy to work with and as little fluff as possible.

Orientation

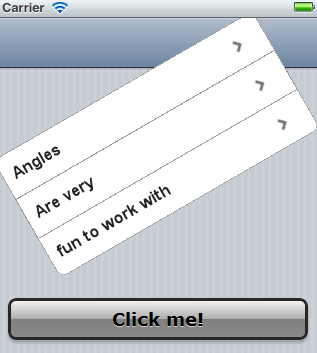
Angles should be used prudently

Angles should be used prudently

Another cool feature that is now going through the test phase is the Angle property. All components that derive from TCustomControl have this property, and as the name suggests you can use it to rotate the control as you see fit. While it’s not the biggest feature in the world it does open up for a more colorful expression in the user interface. Want a yellow price banner over a product? Put a label on it, set the color and put -30 in the degree property.

Animations

This feature is my favorite, but it’s also the most complex to capture under object pascal. Webkit allows you to define animation sequences, which can then be applied to a html element or a style. You then use a trigger rule to activate the animation. The cool part is of-course that most of these effects have hardware support – so they run smoothly and without any flicker what so ever.

Since Javascript is not the fastest horse in the stable, at least not on devices like iPhone 3GS – it’s very important to use hardware accelerated animations as much as possible. You don’t want to rotate a picture by manipulating the degree property under a timer. It works of-course, but the results cant be compared to the effects produced by hardware accelerated CSS3 animations.

But of-course, under OP4JS you don’t have to worry about that

 External references

  • CSS Backgrounds and Borders Module Level 3 – www.w3.org
  • The document object model – www.w3.org
animation CSS HTML5

Pages

  • About
  • Feature Matrix
  • Forums
  • News
  • Release History
  • Download
  • Showcases
    • The Smart Contest 2013, Round 1 – Graphics
  • Store
  • Documentation
    • Creating your own controls
    • Debugging, exceptions and error handling
    • Differences between Delphi and Smart
    • Get the book
    • Getting started
      • Introduction
      • Local storage, session storage and global storage
      • Application architecture
      • The application object
      • Forms and navigation
      • Message dialogs
      • pmSmart Box Model
      • Themes and styles
    • Layout manager
    • Networking
      • Loading files
      • TW3HttpRequest
      • TW3JSONP
    • Prerequisites
    • Real data, talking to sqLite
    • System requirements
    • Project types
      • Visual project
      • Game project
      • Console project

Archives

  • December 2019
  • December 2018
  • November 2018
  • July 2018
  • June 2018
  • February 2018
  • September 2017
  • April 2017
  • November 2016
  • October 2016
  • September 2016
  • April 2016
  • March 2016
  • January 2016
  • October 2015
  • September 2015
  • July 2015
  • April 2015
  • January 2015
  • December 2014
  • October 2014
  • September 2014
  • August 2014
  • July 2014
  • June 2014
  • March 2014
  • February 2014
  • January 2014
  • December 2013
  • November 2013
  • October 2013
  • August 2013
  • July 2013
  • June 2013
  • May 2013
  • April 2013
  • March 2013
  • February 2013
  • January 2013
  • December 2012
  • November 2012
  • August 2012
  • July 2012
  • June 2012
  • May 2012
  • April 2012
  • March 2012
  • February 2012
  • January 2012
  • November 2011
  • October 2011
  • September 2011

Categories

  • Announcements (25)
  • Developers log (119)
  • Documentation (26)
  • News (104)
  • News and articles (16)

WordPress

  • Register
  • Log in
  • WordPress

Subscribe

  • Entries (RSS)
  • Comments (RSS)
© Optimale Systemer AS